I have written before about PowerShell in Durable functions. A few weeks ago, the great news was shared that Azure durable functions are now general available . Between my last post and this great news, more patterns have become available for PowerShell. All patterns except Statefull Entities are now supported. To celebrate this, I want to dedicate this blogpost to Azure Durable Functions for PowerShell: Human interaction
Note: I have written about Durable fuctions with a fan pattern and a chaining pattern before. I want to make this a standalone blogpost, but there is overlap in the functionality. So I will copy and paste some elements from that post, which you might recognize.
But why?
So why should you care about durable functions? Well, they provide some functionality that Azure functions don’t offer with the other bindings. The most important one is that it provides you with a state. This sounds vague, but what I mean by that is that you are able to keep track of what your functions are actually doing and have them interact with each other.
There are other ways to have functions interact with each other or with data, like the message queue or with a CosmosDB. But with durable functions, you are able to keep track of what the status of your functions are, what the results are and act upon that data.
To get a very detailed explanation of Azure Durable functions in a PowerShell context, I recommend reading this excellent post.
Prerequisites
There are some resources I strongly recommend using before following along with this post. These are all step by step guides, designed to show the basics.
- If you are completely new to Azure Functions with PowerShell, I recommend you first read my previous post on the subject. Note that the visuals have changed a bit since that post was written, but I think it is still clear to follow along with.
- We are going to make use of local development in Visual studio code. Is this new to you? Follow this page in the Microsoft Docs to see how it works. Another great option is to look at the Azure Functions university, created by Marc Duiker. I have helped with the PowerShell lesson, with a YouTube video if you prefer that as well.
- Microsoft Docs provide a very well-written guide on starting out with an Azure PowerShell Durable function. I recommend following that guide if you are starting out just to get a feel for what we are going to do.
- Take a quick view at what durable functions are in this Doc. Take a look at the images for Function chaining and Fan out/Fan in, as we will work with these options in this post.
Scope of this article
Azure Durable Functions can become complicated pretty fast. To keep this post manageable, I will focus on the structure of the function and not so much on the code. The code is pretty basic and lacks correct logging and error handling. I also assume you have some knowledge on Azure Functions. If you don’t, the sources I have linked in the prerequisites can really help you out!
This scope also means that I will sometimes instruct to just copy and paste code from my GitHub repository if the code is not relevant for the structure of the function.
Note: You should read every script you copy and paste from the internet. If there is something unclear, don’t hesitate to ask in the comments.
Some tips for development in Visual Studio Code
While I was playing around with Durable Functions, I came across some issues that you might experience as well, so I want to mention these tips:
- Use a storage account for the durable function, even when developing locally. I am not sure if emulated storage is supported, but I could not get it to work. I connected an existing storage account by using the debug functionality as described in the guide I mentioned previously.
- If you are playing around, the queue in your storage account can become messy. You might find your function still running old commands when you run
func start. To fix this, you can perform cleanup in the storage account between tries. The following commands are useful when using function core tools.func durable purge-history
This removes the history of your function. More info here.func durable delete-task-hub
This option competely removes all the task files from the storage account (they will be reinstated when you runfunc startagain after deletion is completed). More info here.

- Error messages can be a bit confusing when called from the Orchestrator. Make sure your activity functions are working correctly before calling them from the orchestrator. Also, output matters more than you would expect. A function needs to return something to the orchestrator, even if you don’t use it. Work with Write-Host and Write-Output to create readable output and direct the output of functions to variables to make sure that is not the issue.
- Be careful to use the correct extension bundle. You need version 2 and up. In your host file, it should look like
"version": "[2.*, 3.0.0)"
Use case: Collect a storage account name and let the user confirm if they want it to be created
To show how Azure Durable Functions for PowerShell with Human interaction can work, we are going to create an example. I decided to stick with the theme of creating a storage account that I used before. In this case, we want to signal a user that a storage account name has been generated and let them choose to actually create the storage account.
To do this, we need some way to reach the user. I have decided on using Teams as that is relatively simple to set up. So the user will get a message in teams with a link to approve. After the account is created they will get a confirmation if the account gets created.
Note: I will skip over some of the details, like how I post to Teams and how I deal with secrets. The focus on this post is on the structure of all the functions and less on the code in the functions. All the code that I have used is available though.
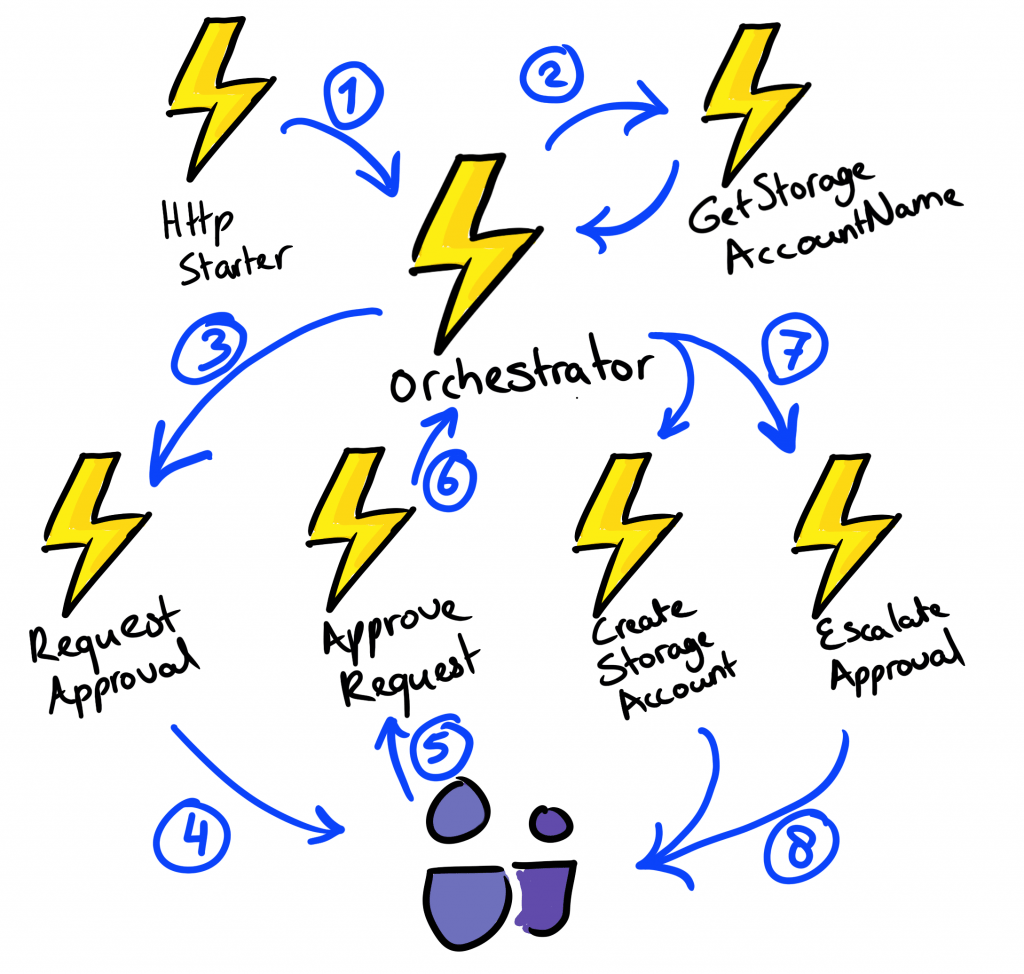
To get a bit of an idea of how it works, I made this drawing that shows all the steps that will be taken
Seems complicated? Don’t worry, we will go through it step by step. I’ll number all steps as we take them according to this drawing
Set up the base
First, let’s create the function base for local development. We are going to use Visual studio code.
Create a new project and add the following functions:
If you get stuck somewhere, first follow the guide in the prerequisites that shows how you can make a local version of the function.
Name: Orchestrator
Template: Durable Functions orchestrator (preview)
Reason: In this function you will orchestrate the other functions. So you will define the patterns you want to use for the actions
Name: HTTPStart
Template: Durable Functions HTTP starter (preview)
Authorization level: Function
Reason: You start the orchestrator through the http-start. Here you can define parameters as well.
Name: GetStorageAccountname
Template: Durable Functions activity (preview)
Reason: This is the first activity, it generates a storage account name. We can later call it through the orchestrator
Name: NewStorageAccount
Template: Durable Functions activity (preview)
Reason: This is the second activity, it creates a storage account. We can later call it through the orchestrator
Name: RequestApproval
Template: Durable Functions activity (preview)
Reason: This activity will send a message to Teams to request approval from the user
Name: ApproveRequest
Template: http
Authorization level: Anonymous
Reason: This activity will be used to send the ApprovalEvent to the orchestrator so it knows to initate the creating of the storage account
Name: EscalateApproval
Template: Durable Functions activity (preview)
Reason: This activity will be triggered if no response is given within the allocated time.
Step 1: The HTTP starter
The http start is meant to help us call the orchestrator and trigger the chain of the durable function. The good thing is that this is almost completely filled out when you create the function. We will only add one thing: As we are going to use the function URL at a later point, we will add it here as input. To do that, take line 6 and change it to this:
$InstanceId = Start-NewOrchestration -FunctionName $FunctionName -input $TriggerMetadata.Request.Url
Step 2: Get storage account name
From now on, we will work with the orchestrator, combined with other functions. The orchestrator is the heart of the durable function. It triggers actions and keeps the state. So we will get back to it a few times.
GetStorageAccountName
The activity functions we just created are a lot like functions you might already be familiar with, that are called through an http request or a schedule.
Copy and paste the script in this link to the run.ps1 file
Orchestrator
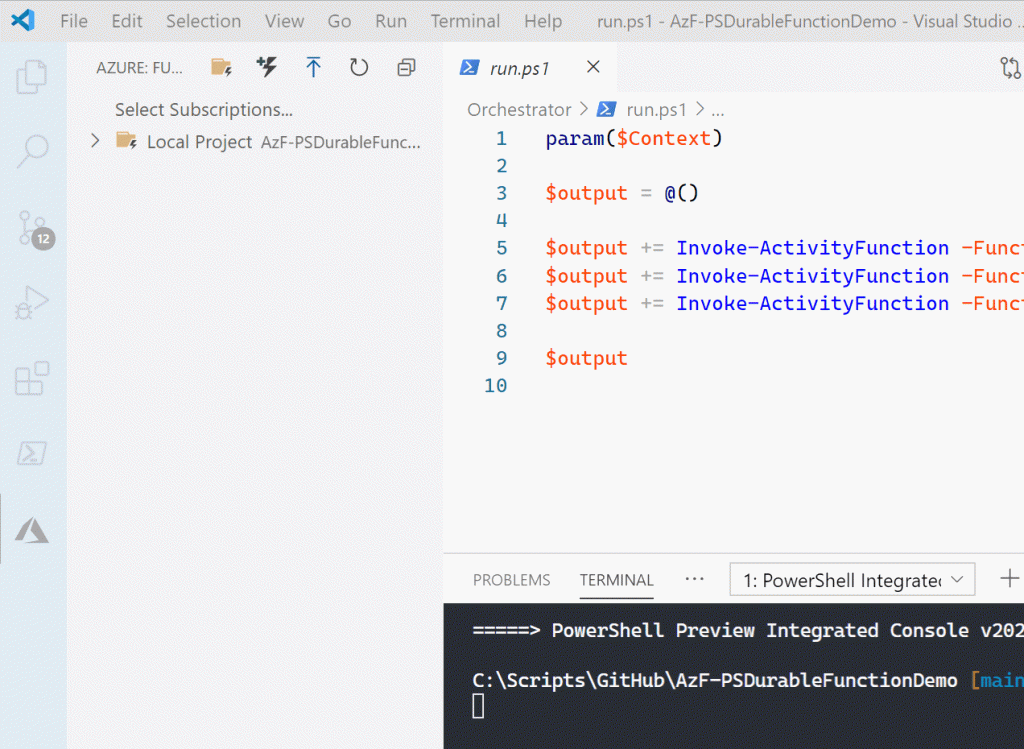
Now that we have a function to call, remove the default code from the orchestrator and replace it with the following
param($Context, $TriggerMetadata)

$StorageAccountName = Invoke-ActivityFunction -FunctionName 'GetStorageAccountName'
"New StorageAccount Name: $StorageAccountName"
Step 3 & 4: Request approval and post in Teams
We have a storage account name, now we want to pass it through to the user and have them decide if it needs to be created. To do that we use the function RequestApproval.
RequestApproval
What this script does, is create the URL that points to the function ApproveRequest, so the user can click that link. The URL is send in a Teams message.
To send a message to Teams, I have created a connection that uses a webhook to send a message to Teams. If you want to use the same functionality, You can find out at the bottom of this post how to create a connector. Store the url of the connector in local.settings.json under the name “TeamsURL”.
To get the same result, paste this code in RequestApproval/run.ps1
Orchestrator
We want the orchestrator to wait for the input of the user. But we don’t want the orchestrator to be stuck waiting forever, because it also needs to handle other requests. So what we will create is a timer that starts running when the approval is asked. The Orchestrator will than wait what occurs first: the users approval or the end of the timer.
For this use case, I’ve set the timer to 5 minutes. You can change that if it fits your case better.
With the following lines, we give all the relevant information to the RequestApproval function and start a timer. With Wait-DurableTask, The function will wait for what event will come first: an approval or a timeout.
$instanceId = $TriggerMetadata.Context.instanceId

$duration = New-TimeSpan -Seconds 300
$Object = [PSCustomObject]@{
    storageAccountName = $StorageAccountName
    instanceID         = $instanceId
    RequestUrl         = $Context.Input
}
Invoke-DurableActivity -FunctionName "RequestApproval" -Input $Object

$durableTimeoutEvent = Start-DurableTimer -Duration $duration -NoWait
$approvalEvent = Start-DurableExternalEventListener -EventName "ApprovalEvent" -NoWait

$firstEvent = Wait-DurableTask -Task @($approvalEvent, $durableTimeoutEvent) -Any
Step 5 & 6: Give Approval back to the Orchestrator
The above code will leave us with a little message in Teams where we can give approval.
The next task is to create an approval event so the orchestrator knows that it can start the creation of the storage account.
Let’s look at the theory real quick. If we look at the Microsoft Docs , there are two ways to approve the workload:
- An HTTP post request to http://[functionURL]/runtime/webhooks/durabletask/instances/{instanceId}/raiseEvent/ApprovalEvent
- Make use of Send-DurableExternalEvent in a different function within the same app
I have looked through the code for Send-DurableExternalEvent and it basically creates the HTTP post request for you. So that is a cleaner solution and it works well locally. The problem that I had is that if you want to send the ApprovalEvent in Azure, it requires to use the system key. And for me Send-DurableExternalEvent didn’t do that and returned a 401.
There is probably a reason for that, but to get this function running, I decided to manually add the http request to the ApproveRequest-function. This also gives a good view of what we are doing.
This does mean that the code needs access to the Key. I have stored the key in Key Vault and referred it through the application settings.. You can find links for more information on that in this post.
With that reference in place (the script uses the application setting “key”), you can copy and paste the code from this link in ApprovalRequest/run.ps1.
Step 7 & 8: Orchestrate the follow up action and report back.
At this point, one of two things can happen: The orchestrator has received an approvalEvent, or the timer has run out. Based on those two options, two different functions are needed
NewStorageAccount
When an approval is received, a storage account need to be created. We use the function NewStorageAccount for that. In this function we will create the storage account with the Azmodule, and we will create a teams message to send back.
You can find the Code to do this here. Copy and paste it to your function.
One important thing is to do is to change the resourcegroup in the code, which has been hardcoded for simplicity.

EscalateApproval
If the timeout hits first, another function can be triggered. We use this function to let the user know that time has run out and approval can’t be given anymore.
Copy and paste the code from here.
Orchestrator
In the orchestrator, we now need to add the logic which calls the functions, based on which event returned first. We do this with a simple if/else loop. Add this code to the orchestrator
if ($approvalEvent -eq $firstEvent) {
    Stop-DurableTimerTask -Task $durableTimeoutEvent
    Invoke-DurableActivity -FunctionName "NewStorageAccount" -Input $StorageAccountName
}
else {
    Invoke-DurableActivity -FunctionName "EscalateApproval"
}
Other Settings
There are a few other settings to take care of:
requirements.psd1
This function needs parts of the Az PowerShell modules. You could download the entire module, but that would take a long time and you don’t actually need them. Instead, define the submodules you need: Accounts and Storage. This should look like this:
@{

'Az.Accounts' = '2.*'

'Az.Storage' = '3.*'

}
Local.settings.json
If you want to develop locally, you add the TeamsURL here. You also want to attach a storage account. I find the easiest way to do that is by pressing F5 (debug), as it will collect the connection string and setting needed for you. You can choose to use an existing storage account or create a new one from Visual Studio Code. After you have added the storage account, you can close debug mode by clicking disconnect ad the top of the screen

When deploying to Azure, don’t forget to add the TeamsURL and the key to the application settings.
Managed identity
When you run this function locally, it can use your credentials.
If you deploy it to Azure, you need to give the function permissions to create the storage account. You can do that through a managed identity.
Deploy and use the function
With everything in place, we are now ready to run this function. You can either do that locally with the Azure Function Core tools, or deploy it to Azure with Visual Studio Code. Follow the guides in the prerequisites for instructions on how to deploy to Azure.
To start off the process, you can use the following URL:
Invoke-RestMethod http://localhost:7071/api/orchestrators/Orchestrator
If your function is in Azure, your URL will have this format:
Invoke-RestMethod "https://[functionname].azurewebsites.net/api/orchestrators/Orchestrator?code=[key]"
You alternatively use the browser for the trigger. After the first trigger is done, the Team messages will appear in a few seconds.
Conclusion
You can find all the code that was used here in my GitHub
So that is how you work with Azure Durable Functions for PowerShell: Human interaction. I know that there is a lot going on, but I still hope this can help you get a feeling for the structure and that this example can help you make your own. If you have any questions, leave them in the comments.


Pingback:June 13, 2021 Weekly Update on Microsoft Integration Platform & Azure iPaaS - Hooking Stuff Together
Nice article,
It’s all new to me, but I’d like to learn a bit more about Azure Functions. I followed your article all the way, just need to make the logic app for Teams. Now when I start the function alone (func start –debug) I get the following error message. Do you maybe know what I’m doing wrong or how can I best troubleshoot this?
[2021-06-27T12:06:11.805Z] Worker process started and initialized.
[2021-06-27T12:06:12.068Z] Worker failed to function id 4d20aa54-1918-430d-a817-0640174fd5dd.
[2021-06-27T12:06:12.072Z] Result: Failure
Exception: No parameter defined in the script or function for the input binding ‘name’.
[2021-06-27T12:06:12.075Z] No input binding defined for the parameter ‘Request’ that is declared in the script or function.
Kind Regards,
Arie
Hi Arie,
I think somewhere the name of the binding in the function.json file and the parameter at the top of the run.ps1 file got mixed up.
You need to use either name or request, but they need to be the same.
So if you look for example this file, you see
"name": "Request",on line 5.This only works because the paramater in this file has defined the parameter Request in line 3.
So I think you might have used “Name” in one of the files and “Request” in the other file in one of your functions.
Pingback:June 13, 2021 Weekly Update on Microsoft Integration Platform & Azure iPaaS - BizTalkGurus