I had some trouble deciding on the title for this blog post. Technically it’s not responding to a Teams Message, because it starts a new conversation. I have called this creating a Teams Bot before, but it isn’t truly a bot either. The process I want to create: Someone posts a Teams message. An API is called that gives data back. That data is automatically posted in the Teams channel. So that is what we will create. In this post, I want to take you step-by-step to respond to a Teams message with a logic app and a webhook.
But Why
So how could it be useful to automatically respond to a Teams message? By setting up the Logic App with an API call, you can make data or information available in Teams. So when you post a message to Teams, the following could happen:
- Get a count of the current work items in Azure DevOps
- See the current weather
- Translate the message to another language
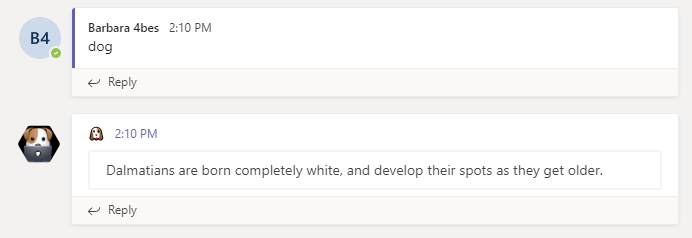
- Get a random dog fact
This makes for a short and simple way to get this information for all the members of the Team.
Find an API
First thing you would need to do, is find an API that can do what you want to accomplish. Azure Cognitive Services might come in real handy for example. But you can connect to anything that works for you. To play around, there are a whole lot of fact generator API’s you could use. If you want to follow this guide, you can skip this step.
What we will create
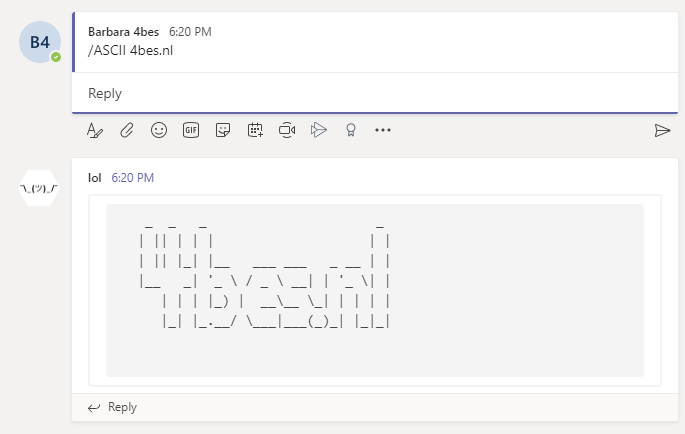
For this post, I have chosen an example to respond to a Teams message with a logic app. I want to create a solution that takes the posted message and converts it to ASCII-Art. We can debate on if that is useful, but it surely is fun. To keep the channel clean, I only want the message to appear if the Teams message starts with /ASCII.
The API I can use to reach this goal is http://artii.herokuapp.com/. So let’s get started.

Create a Teams channel
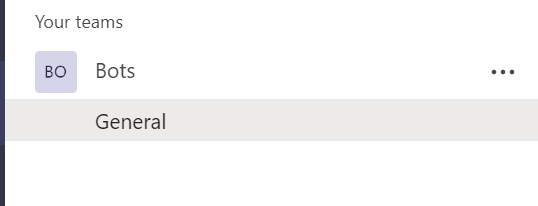
The first thing we need to do, is select a Teams channel that we are going to use. You can use an existing one or create a new one. For this post, I have create a Team called Bots. I will use the General channel.
Create a logic app
Next, we create a logic app. You can do that in the Azure portal.
To find out how, follow the steps in this guide for Create your logic app.
You should end up with the Logic Apps Designer in your browser.

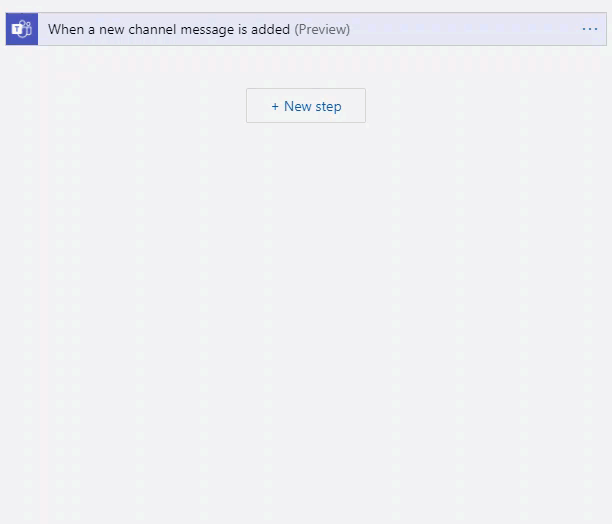
Set the trigger
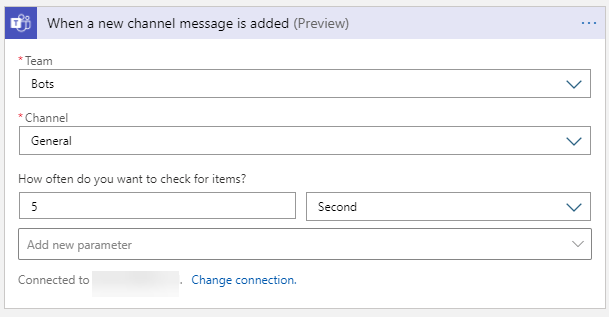
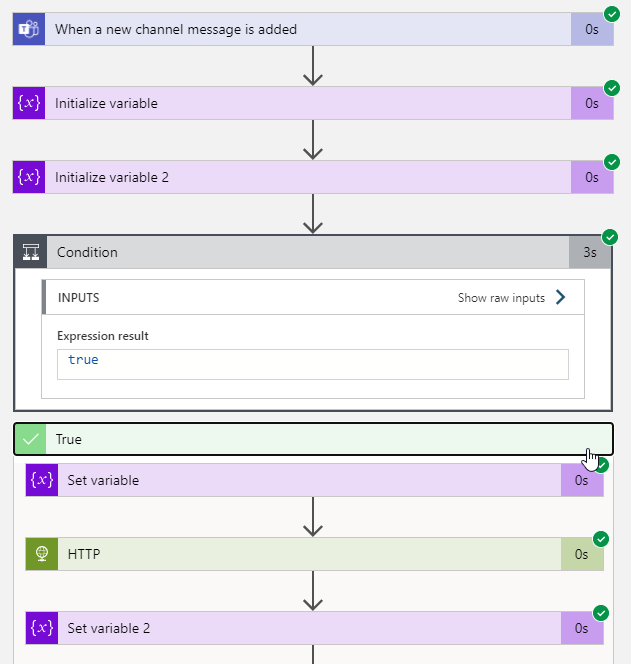
Let’s set the trigger. We want to let the Logic App run when a new message is posted in the Teams channel. The fasted way to find the trigger is to search for Microsoft Teams, click the category and then select the trigger When a new channel message is added (preview).
You can now sign in to Teams. This account can be a different account than the one you use in Azure and I encourage you to think about the account that you use here. You are creating a connector that is available to anyone that has access to this logic app. So you might want to use a service account. The account needs to have permissions to the channel you have selected previously.
Once you have signed in, you will be able to select the channel you need from a drop down menu.
Set the frequency to once every 5 seconds. This means that the logic app will check every 5 seconds to see if new messages are available. When a new message is posted, the logic app will start its flow.
Note: This check is not consistent. There is some kind of minimum interval here, but I have not been able to find it. Count on a delay of about 30 seconds being possible.
Create variables
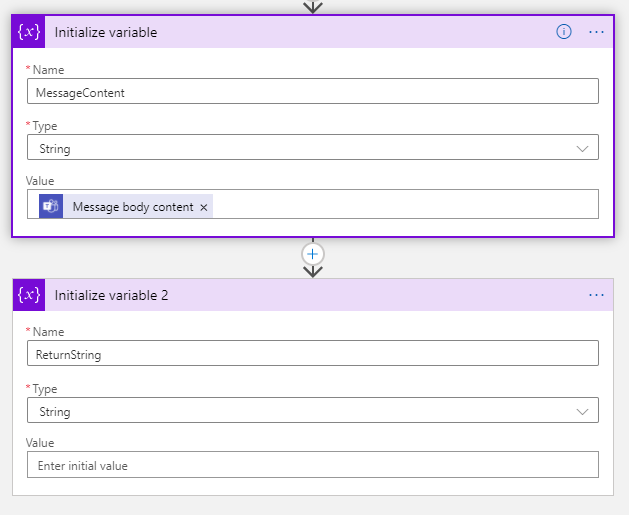
When a new message is added, it will create some objects for your logic app. To convert this to data we can work with, let’s create some variables.
In a Logic App, a variable needs to be initialized on a top level (so it can’t be done in a condition for example). You can then work with the variable in the rest of the Logic App. We are going to need two variables for this app:
- One for the message that was posted in Teams
- One for the message that will be returned.
To do this, you click new step and search for Variable. You will find the category Variables and then the action Initialize variable.
First, work with the Teams message:
- Name: MessageContent
- Type: String
- Value: Message body content (this is a dynamic value that you can grab from the drop down.)
Than add a new action to initialize a variable with the following values:
- Name: ReturnString
- Type: String
- Value: Leave the value empty
It should now look like this:
Only run when a certain text is used
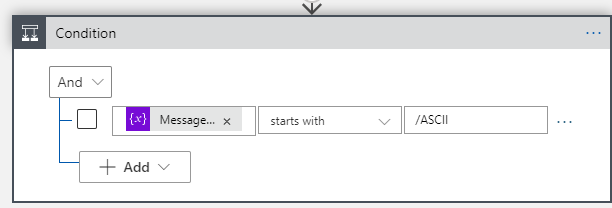
As I described, the Logic App should only return a message when a message starts with /ASCII. To do this, we will use a condition. You can find the option Condition under the category Control.

Now, you can select what condition you want to test. You are able to test multiple conditions in one action. In the end you can define actions based on if the condition is met or not.
We want to test the variable MessageContent, to see if it starts with /ASCII.
This would look like this:
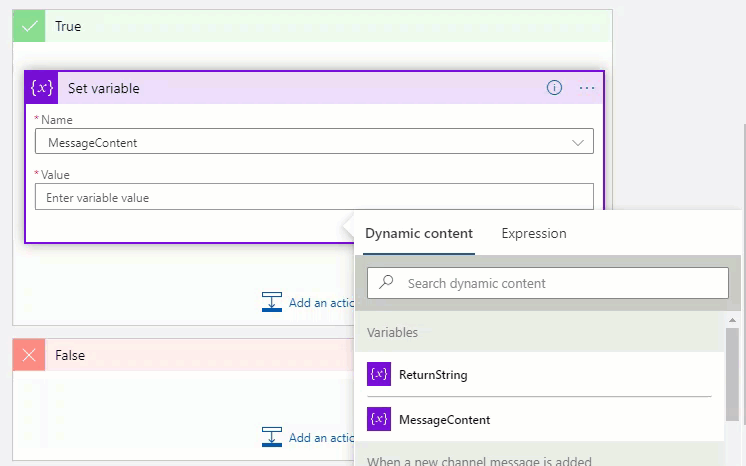
Now we can create the all new actions in the True box, as we do not want to have action taken on messages that do not start with ASCII.
Note: The condition is case sensitive. So it will respond to /ASCII, but not to /ascii or /Ascii. You could add them as extra options to the condition though.
Change the message variable
From this point, we are working in the True box.
First thing we do, is change the MessageContent variable. We want to use the message content, but without /ASCII prefix. To do this, we use the action Set variable, within the Variable category.
You can select the variable in the dropdown and give it a new value.
To create the value, you can use dynamic content and an expression. We will use the message body content again, as it is not possible to refer to the variable itself when you change it. We will use replace to replace ‘/ASCII’ with an empty spring. So your result would be as following:
replace(triggerBody()?['body']?['content'],'/ASCII','')
The interface of Logic apps can help you a bit with the formatting.
So now the variable is changed to the string that was in the message without the /ASCII.
Call the API
Next, we pass the messageContent to the API. The API I am going to use here is artii.herokuapp.com.
You pass a text to the URL and it returns the same text in an ASCII art string. You can find examples on how it is formatted on the website. The format we are looking for is http://artii.herokuapp.com/make?text=hereyouputthetext.
From the Logic App, you can use an HTTP call to do this. Search for HTTP to add it to the workflow.

Now you can fill in the Method and the URI.
The method should be GET.
For the URI, you can combine the URL we found in the documentation (http://artii.herokuapp.com/make?text=) with the variable MessageContent. The result should look like this:
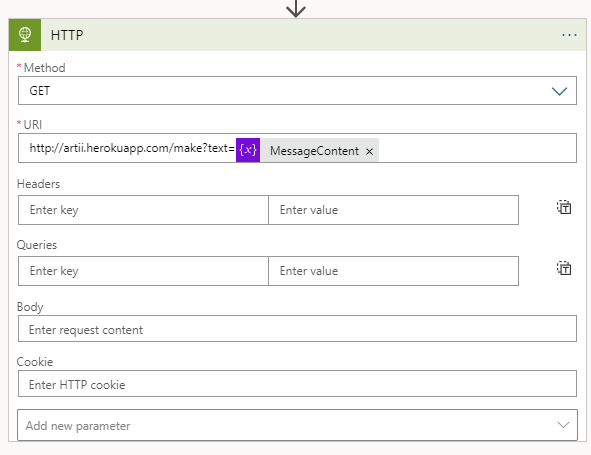
You can leave all the other fields empty.
Note: This example of the HTTP method should translate to other APIs that do not require authentication. If you want to use something like a fact generator, you can add the URL without a variable.
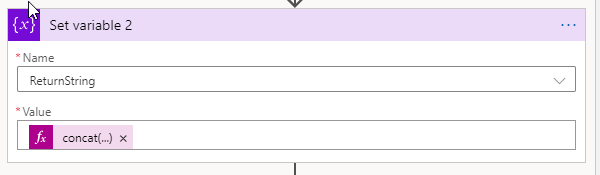
Format the ReturnString
Often some action is still needed to get the ReturnString in the correct format for the Teams Message.
An example is that an API return is often formatted as a JSON. So you will need to extract the message (you can use the action Parse JSON to get the different properties from the JSON). In this example, the message isn’t formatted in a JSON. This output will not work in the Teams message though, as ASCII-Art requires that the spaces are being kept into the message. To get this result, you can use a bit of HTML. By using <pre> in the message, the whitespaces are kept in place.
To get this correctly into the message, we can change the variable returnstring. We can add </pre> at the front and </pre> at the end of the HTTP body from the previous step. By using concat, this becomes one string in the variable.
concat('<pre>',body('HTTP'),'</pre>')
Bring the message back to Teams
There are a few different methods to give the message back to Teams. The most straight forward options are to use the actions Post a message (V3) (preview) or Post a message as the Flow bot to a channel (preview).
The first option will post the message as the user that you have used to create the connection. The second option will use the Flow bot, so it is more clear this is an automated message. There is still a reference to the account that created the connection in the message.
For this post, I want to take it a step further. We will create a connector in Teams that is able to post the message. That way we can use a custom avatar and name. First, we need to register the connector in Teams.
Register a connector in Teams
In Teams, move back to the channel you created earlier. Click the three dots after the channel name and select connectors.

The connector you want is Incoming Webhook. Click Add. In the screen after, click Add again.
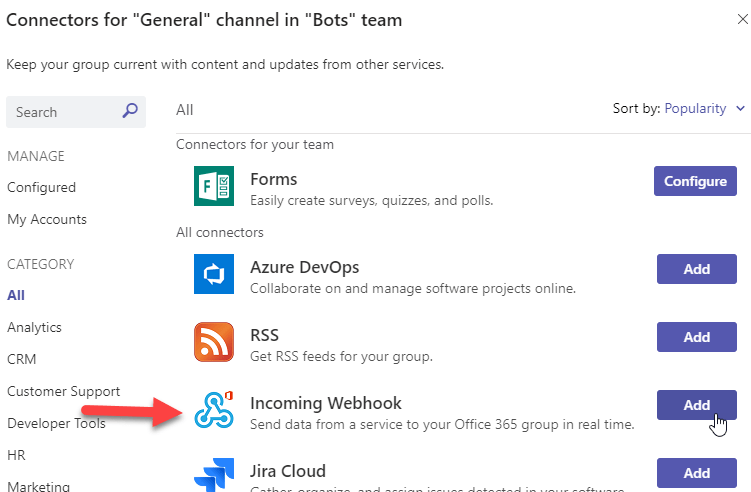
You can now give the connection a name and an image, which will be used when the message is posted.

When you click Create, the screen shows you an URL. Copy the URL so we can use it in the final step.
Click Done and close the Connectors window
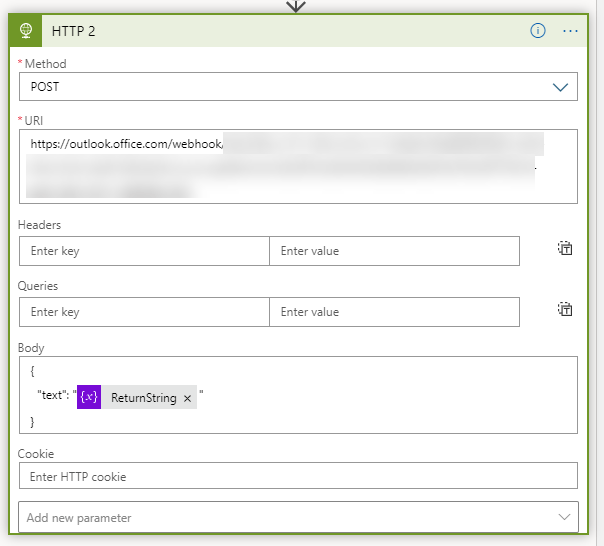
Send the message to Teams
For the final step, we want to post the message to Teams. To do that, we are going to use an HTTP action again. Fill out the following values:
- Method: POST
- URI: The URL we copied in the last step
- Body:
{
“text”: “@{variables(‘ReturnString’)}”
}
You can paste the ReturnString in the body from the dynamic content.
Test the Logic App
You can now save the Logic App and see if it will respond to a Teams message.
To run the first test, it helps to click Run at the menu. This way when you trigger the Logic App, you will see all the actions that were taken.

Click Run and post a message in your teams channel and see if the Logic App starts running.
And there we go!
You can see the steps the logic app ran in the portal.
Conclusion
You now have a logic app that can respond to a Teams message with a Logic App.
I hope this guide helps you to start playing around with the different actions in the logic app to make your own custom messaging automation.
If you have any questions or want to show of your own solutions, leave a comment!