GitHub and Azure Function apps can be a great combination when it comes to Serverless automation. How about automating the management of your GitHub repository, files and issues? Or the other way around: use GitHub Gists or a repository as a data source for your function app. In this post, we will walk through some connections between GitHub and Azure Function Apps and how you can securely implement them: Webhooks and the GitHub API. After that, let’s look at some examples.
This article is part of #ServerlessSeptember. You’ll find other helpful articles, detailed tutorials, and videos in this all-things-Serverless content collection. New articles from community members and cloud advocates are published every week from Monday to Thursday through September.
Find out more about how Microsoft Azure enables your Serverless functions at https://docs.microsoft.com/azure/azure-functions/
Trigger a function app from GitHub
Let’s start with a function app that is triggered by GitHub. You can make use of a webhook in your repository. This means that when a certain action happens in GitHub, an URL will be triggered. In this case, we would use the URL of the function app. So let’s first create that URL in the function app.
Create a function with an HTTP trigger. For some guidance, you can follow the guide on Microsoft Docs.
Change one thing in the guide: On step 4 when you are creating the http function, set the authorization to Function instead of Anonymous.
When you set the function authorization to Anonymous, it means everyone with the name of the function app can call the function. This can be useful for web apps for example. But chances are that whatever action you want to trigger now is not meant for the internet to use. By setting authorization to Function, a key will be added to the URL.
After you have created the function with an http trigger, find it in the portal. You can now get the Function app URL at the top of the screen.
Set the GitHub webhook
Let’s move back to GitHub. Open the repository that you want to use as a trigger. On the right, click settings.

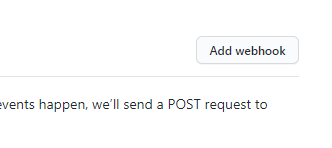
In the menu on the left, you can now select webhooks. At the top right, click Add webhook.
GitHub will now ask you to confirm your password as an extra security measure.
After that, you get a menu to set up the webhook. First, add the Function App URL you copied before to the Payload URL field. For a function app to work you want to set content type to application/json. You can leave the secret empty as the key it is part of the URL.
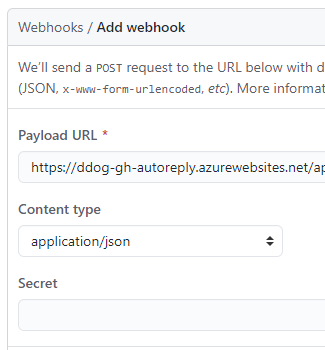
You can leave SSL verification as it is.
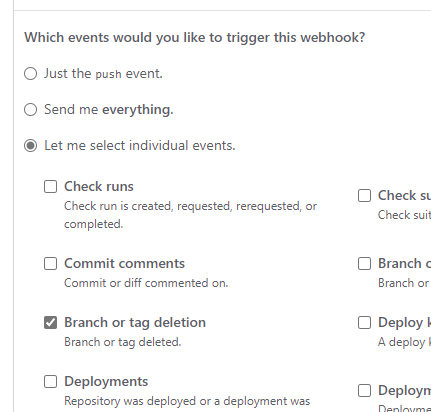
Now, you can select what event you want to be a trigger for the webhook. By default, it triggers on a push event. You are also able to select to get a trigger on every event. But let’s say you want to use a specific trigger. You can change the setting to Let me select individual events. Here you can choose one or more type of events you want to behave as a trigger. Don’t forget to deselect Pushes if you don’t need that setting, it is selected by default.
After you have selected the events, click Add webhook.
And that’s it. Your function app will now be triggered when the event you selected happens in your GitHub repository.
Manage GitHub from your function App: The GitHub API
We now have a way to trigger our function app. But how can we make the function app perform actions in GitHub? The answer here is through the GitHub API. By calling the API you can perform pretty much any action you can manually. Want to know the possibilities? Find the reference here.
How you call the API depends on the language you use. GitHub has created some libraries that can help you. Find out if your language is listed here.
If your language is PowerShell, I have written about using the GitHub API in my previous blog post.
Authentication
The best way to authenticate against the GitHub API is with an OAuth application, as described in the documentation. To keep it a bit more simple in this post, we will use basic authentication and a personal access token. This is less secure, but works for script languages and for dev environments. Read how to get that token from your account in my previous blog post.
What is interesting when it comes to Azure Function Apps, is how you handle secrets. In this case, the GitHub personal access token. This token should be stored in a secure way, so plain text in the script is of course not an option. What options do we have?
Application settings
The Application settings can be used to store your token. You put the secret in the settings and use is as a variable in your code. This way, you know for sure that the token can not accidentally become public when you publish your code. The down side is that this secret is available for anyone who has access to the Function App. Let’s see how it works.
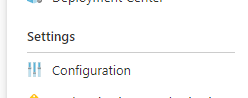
Go to your function app in the portal. Under Settings, find Configuration.
Here you find the application settings. Click New Application setting to add one.
Now you can fill in the name that you want to use to call the setting in the code. The value is where you would add your token.
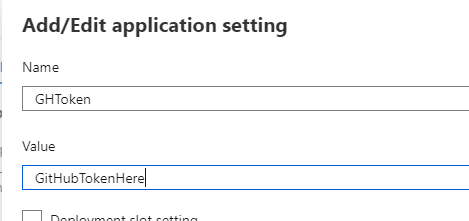
Click OK and this is now a variable that you can use in your function app.
If you would rather use the AZ CLI to add the setting, you would use the following code
az functionapp config appsettings set --name FunctionApp \
--resource-group ResourceGroupName \
--settings GHToken=GithubTokenHere
To find out how you can call the new application setting in your code, find the guide for each language here.
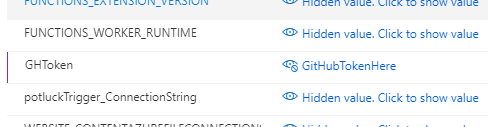
As you can see in the portal, the values of the application settings are hidden by default. But it takes just a click on the link to see the value. This means that everyone with access to the function app has access to your token.
Key Vault
So that is where key vault comes in. With Key vault, you get a key management solution, aimed for applications. You can store the secrets in the key vault and give the application access to it. Access to the secrets is very granular, so no one has permissions they don’t need. Plus, you can update the secret when needed, without needing to change your code or settings.
The basic process to use a key vault with your function app:
- Create a key vault
- Enable the system managed identity on your function app
- Create an access policy in key vault to give your function app permission to view the secret
- Create a reference to the key vault secret in the Application settings
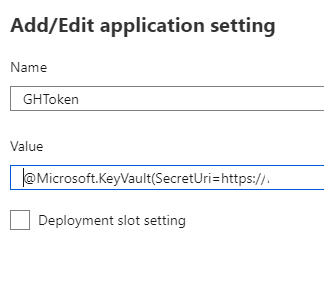
Now you can use that application setting like you did in the previous step.
Want a bit more guidance? Check this guide
Want a step by step guide? I recommend this blog post by Josh King.
Examples
Great stuff, but how can you use it?
Let’s look at some examples of how these tricks can help you. I have collected these examples from 25 days of Serverless, a challenge that took place in December 2019 (you can still do the challenges though!). I did the challenge in PowerShell, but I will link to entries by other participants that use different languages.
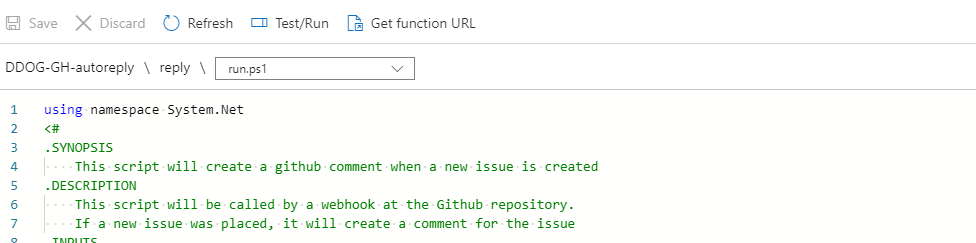
Autoreply to new issues
An example that uses both connections, is an autoreply when a new issue is posted.
To do this, you create a webhook that gets triggered by an issue.
In the code, you check if the trigger was caused by a new issue. If this is the case, a message is pushed to the GitHub API, so it will be an answer to the issue that was the trigger.
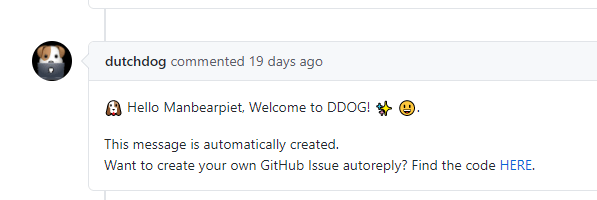
This is the example I created for a talk on the Dutch DevOps & GitHub community.
Find the PowerShell Code here.
Find solutions in other languages here.
Use GitHub as a file storage
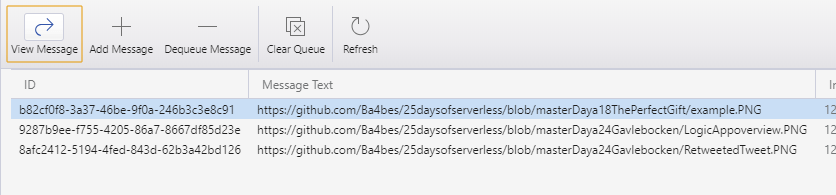
Now we want to use the GitHub repository to store files. People can add files an an action would be triggered in the function app. For example, if can check if a new file was a picture and if so, show them on a website.
So the Function app is triggered when a new commit or push is made to a repository.
The application will check if the new files contains pictures and work with these pictures. In this example, the pictures are places in a storage queue.
Find solutions in other languages
Use GitHub Gists as a source
For the last example, we want GitHub Gists as our source. We want to trigger the function app ourselves with an ID. The function app can now use the file in the Gist. The example app works with a Markdown file and turns it into HTML.
GitHub Gists can be called with the GitHub API. If you collect public Gists, you don’t even need to authenticate.
To convert the file to HTML, I actually used another GitHub API: The Markdown API.
The result is given back to the HTTP request.
Conclusion
These are some ways to automate GitHub or use GitHub for automation. I think Azure Function apps and GitHub have multiple ways to work in each others favor. Let me know how you have combined the two in the comments or on Twitter! Keep track of all the Serverless September entries by looking for #ServerlessSeptember on Twitter!