There are a lot of use cases for calling a REST API from PowerShell. You can use it to manage Azure, manage GitHub, work with Microsoft 365, or use cognitive services in Azure. But there are a lot of other use cases and when you work as an IT Pro with PowerShell, at one point or another you might find yourself in need of using an API. In this post, I want to give a very practical guide on how you can make REST API calls from PowerShell.
What is a (REST) API?
First, some theory.
I think this post explains very well what an API is. If you are not familiar with the concept I recommend reading it.
You can see an API as a service that can help you automate the processing of certain data. A lot of large webservices offer an API to help developers with their applications.
Invoke-RestMethod
When you call a REST API from PowerShell, you will use the cmdlet Invoke-RestMethod. To get a complete overview of this cmdlet, click here.
If you want to practice calling specific APIs, you can use tools like Postman or the REST client VSCode extention. This can help you get used to new API without worrying if your PowerShell syntax is correct.
URI
An API call is a request through HTTP or HTTPS. So you need an URL to send the request to. Every API has some kind of documentation or reference. This documentation provides instructions on how you can authenticate and what URLs you can call to get data. Most of the documentation will give you examples as well. These examples are often given in CURL, but once you get the hang of Invoke-RestMethod it should easily translate to PowerShell.
Methods
An API call needs an URL, but it also needs a method. The method describes what you want to do. There are a lot of options available, but the ones you will probably see the most are:
- Get: Get data
- Post : create a new data entry
- Put/Patch: change an existing data entry
- Delete: delete a data entry
If you don’t define a method, Invoke-RestMethod will use GET by default.
Making a basic request
Time to put it to practice. Let’s look into a basic API that does not request authentication or input. As an example I use a random number fact generator:
When you scroll through the site and read the documentation, it tells you how your URL should be structured. This also shows how you can get different results by just changing the URL.

So let’s try one of these options. Enter the following:
Invoke-RestMethod http://numbersapi.com/4
Note: You don’t have to define the method, it will default to GET
This will give the following results (as the fact is random your result will be different):

Now you can play around with the URL to get different types of information.
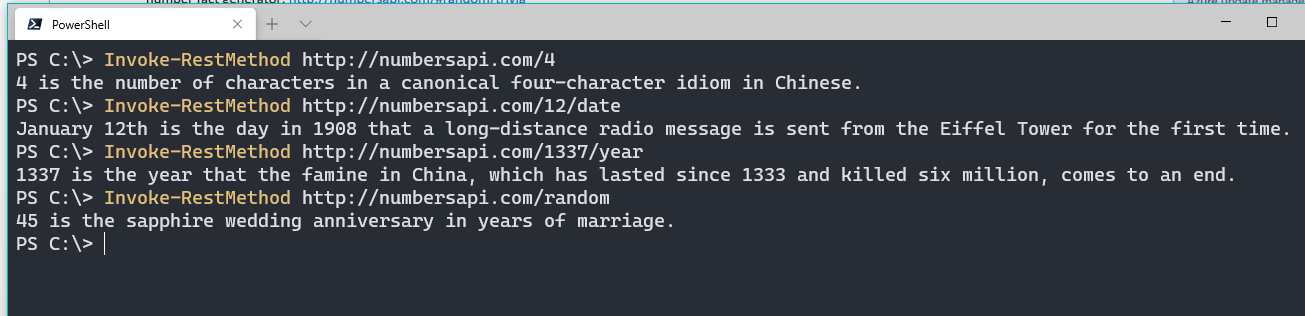
This is the most basic API call structure you can use. Request an URL and get data back.
Add a query
You can add more information to your request by adding a query to the URL.
We will stay with the Numbers API. If you scroll down the page, you will find some options to get more precise information. For this example, we will request a random number and define a minimum number and a maximum number.

As you can see, you can add the extra information directly into the URL. In this case the two parameters min and max.
To do so, you add a question mark (?) to the end of the URL before defining a parameter. If you want to add more than one parameter, you can put an ampersand (&) in between them.
In our API call, you would use this cmdlet:
Invoke-RestMethod “http://numbersapi.com/random?min=10&max=20”
Be careful to use quotation marks around the URL so it is interpreted as a string.

Add a JSON body
Now let’s try another method instead of GET. As said before, you can use POST or PUT to add information to the data or resources that the API manages.
When we try to add information to the dataset, we can wrap that information in a JSON or XML body. As JSON is one that is used far more often in my experience, I will focus on a JSON body.
Note: It’s very rare to find an API where you can add information without authenticating. Because of the learning experience, I have created an API experience with a Azure Function App. Here you can add information to a database without authentication. This API will be up as long as my database can handle the input and the internet behaves itself :).
I see the entries that come in and I also allow everyone to view all entries without authentication, again for the learning experience. So don’t put anything private in your message!
The API we are using is an Azure Function App I created for 25 Days of Serverless. You can find the code here.
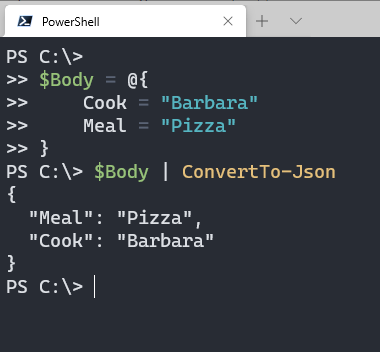
This API is for a Potluck where people can leave their name and what they will cook. So the body needs to describe a cook and a meal. The JSON object that you need to pass on is the following:
{
“Cook”: “Barbara”,
“Meal”: “Pizza”
}
Create the body
To create this body, you could simply create a string around the JSON-code. But the JSONs can become quite large and complicated. At that point, it might be easier to create a PowerShell object or a HashTable. After your script is done working with the object, you use ConvertTo-JSON to give it the correct format. For the above object, this would look like this.
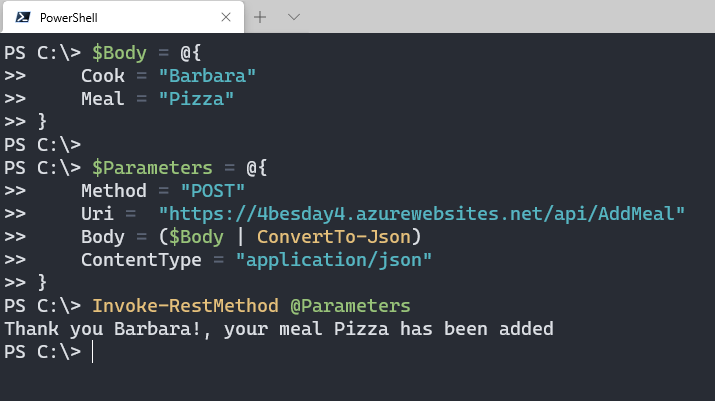
Add the body
Now you can pass that JSON object in Invoke-RestMethod. In the case of the API we are testing here, this is the code you would run (change the parameters to your own version). Note that the method is now defined as POST.
$Body = @{
    Cook = "Barbara"
    Meal = "Pizza"
}

$Parameters = @{
    Method = "POST"
    Uri =  "https://4besday4.azurewebsites.net/api/AddMeal"
    Body = ($Body | ConvertTo-Json)
    ContentType = "application/json"
}
Invoke-RestMethod @Parameters
Note: This is a free Azure Function app, which has a startup time. Allow the API a few minutes to respond the first time you call it.
If you want, you can change the entry you created or view all entries. To play around, find instructions here.
Add an Authentication header
There are some APIs that do not require authentication, but as soon as you want to use PUT or POST, you will find you need to authenticate.
For some theory on the different kinds of authentication, this post gives a good explanation.
For authentication, you use the -headers parameter in Invoke-RestMethod. The format of that header can change, depending on the authentication type of the API. Often you will look at the documentation of the API to find the correct header format.
Creating a header
A header in PowerShell is an object or a hashtable. You can pass it into the headers parameter. So an example syntax would be the following:
 $Header = @{
        "authorization" = "Bearer $token"
    }
Invoke-RestMethod -Uri https://example.api -Headers $Header
You do not have to convert the header to JSON. The exact format of the header will depend on the type of authentication that is used. Let’s look at some examples.
Bearer header
A bearer header works with a token. An example of a bearer header is the SendGrid API, which I covered in a previous blog post. You generate the token from the webservice and use it directly in the header. This would have the following format
To read more about the SendGrid API, read my blogposts here and here.
Basic header
To see an example of how a basic authentication with a token works, we will explore the GitHub API.
The first thing you would do, is look at the documentation. GitHub recommends to use an Oauth application to authenticate, as that is far more secure than basic authentication. But basic authentication is an alternative for development and for a script approach, which we will use. There are other alternative as well, which you can find here .
Before we walk through the PowerShell code, you need to generate a personal access token. You can find out how through this guide.
Note: You now have a string that gives access to your GitHub account. You will not need MFA to get access, which can be a security issue. This is why it is recommended to use this only for test environments. If you do want to use a token for a solution that will be production, consider what permissions are necessary and if a service account might be fitting.
Now that you have a token, you first create the header. For basic authentication, you need to convert the authentication string to Base64. Fortunately, PowerShell is able to do that.
This is how you create a Header object, where $User is your GitHub username and $Token is the token you collected
$User = "GitHubUserName"
$Token = "tokenhere"
$base64AuthInfo = [Convert]::ToBase64String([Text.Encoding]::ASCII.GetBytes("$($User):$($Token)"))
$Header = @{
    Authorization = "Basic $base64AuthInfo"
}
So if I want to collect all my repositories. I would search the reference for Repositories and find this page.
I would need this URL:

Note: the header shown here is for Oauth authentication, so we replace it with the header we just created.
So now we take the header we created before and use the following cmdlet:
Invoke-RestMethod -Uri https://api.github.com/user/repos -Headers $Header

You should now be able to collect all your repositories.
I recommend to play around with the GitHub API, as there are a lot of options. If you do not want to authenticate, you can for example try the Gists API.
OAuth Authentication
With OAuth Authentication, you create a separate API request to get a token. That token is a temporary token that can be used to do other API calls.
To get a better overview of what OAuth really means, I highly recommend this blog post.
Some examples you might know that use OAuth are the Azure REST API, the Graph API and the Azure DevOps API.
To properly explain this process would warrant a complete blogpost in itself. But luckily, other people have already written those blog posts. Some excellent posts were written by the Lazy Administrator and another one by Alex Asplund. Read these posts to learn how to connect with the Azure APIs and get experience with the process of OAuth authentication.
Conclusion
So these are the basics for calling a REST API from PowerShell. I hope this can help you continue your journey with the APIs mentioned and new ones. If you have any questions, please let me know in the comments or on Twitter!
Wat is a (REST) API? just a typo -> What is a (REST) API?
Thank you!
Fixed it
Pingback:My break time browsing list for 27th Aug - Craig Porteous
Pingback:Explore technology – 2020 | Blog for reference – Vijred
Thank you very much. Great intro for beginners wtih REST API.
I need a function, “The purpose is to allow the function to create these $headers from a PSCredentials object. You don’t have to create the PSCredentials object yourself. This must be done by the user himself.” Anyone that can help me?
I am unable to call RestAPI using authorization type as Bearer Token
Hi Shravan,
Could you tell a bit more about what API you are trying to call and what is going wrong?
Thank you for this. Its appreciated
Thanks very helpful
Pingback:How to Call REST API using VS Code – Data on Wheels – Kristyna Ferris & Steve Hughes