There are a lot of reasons to invest in a tagging strategy for your Azure environment. It gives you the opportunity to store information with every resource or resource group. How about storing what team works with the resource, how owns it, what cost center is responsible for it, but also when it was deployed or at what repository the source code can be found. In this post, we will see how you can build and test an Azure tagging strategy with Bicep.
Picking a strategy
Like a naming strategy, you want to consider a tagging strategy. There is some great guidance from Microsoft on your considerations.
Some of my tips:
- Designing a tagging strategy should be a team effort. Make sure you check with all the teams that are using Azure to see what they feel is important to know about a resource
- Watch capitalization. Tags with different capitalization are not considered the same
- Tags are more flexible than resource names. You can change pretty much everything, also for existing resources
- Look at best practices and recommendations from Microsoft docs and other resources. But make it your own. Be critical for what might be relevant in the future, but don’t just create tags because some website says you should. The reason is that it will be hard to keep creating meaningful and correct tags when they don’t really apply to your environment
- Make sure you document your tagging strategy with a very clear description on the purpose of each tags. Do this especially with tags that might not be that clear, for example tags that you use for billing. This is especially important if you have landing zones where people deploy their own resources
Azure policies
To enforce (or audit) the usage of tags, you can use Azure Policies. There are some default policies that will monitor or enforce tags on resources, resource groups or subscriptions. I recommend using these policies to keep track of your governance.
There is a down side to these policies though: If you set the policy to enforce a tag on resources, you will have issues with resources that are not able to be tagged, like runbooks. This should not happen, but at the time of writing I have found this can cause issues.
Another reason I started looking for different solutions, is because I would like to catch the tags in the CICD process.
Create a tagging module
In a previous blog post, I showed how you can create a module to get a consistent naming convention for your Bicep files. You can use the same strategy to make sure your tagging is consistent. To do that, you would create a module similar for this one:
You can change the tags to whatever tags you need for your environment. But this module can help take parameters and create an object.
When working with modules, you can add the tags object to every resource. To do that, I would recommend to add a parameter like this:
param tags object = {}
And add the tags like this to the resource:
tags: tags
This way, a tagging object can always be added, but it is not mandatory, giving more flexibility. If no tags parameter is added, the resource will be deployed without tags. At the end of this post I will link my GitHub repo where you can find examples.
Test the tags with pester
While you can depend on the Azure policies, I always like to have confirmation that the resources are correct with the code. Especially with CICD, you can already tell in your development branch if your templates are correct.
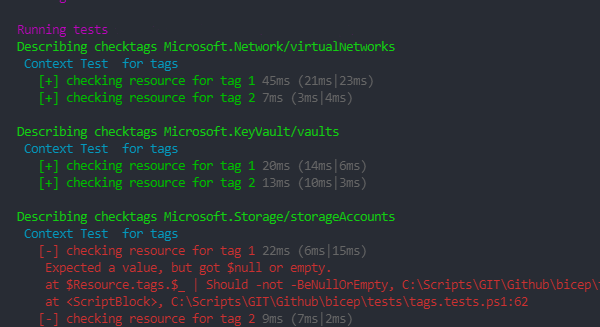
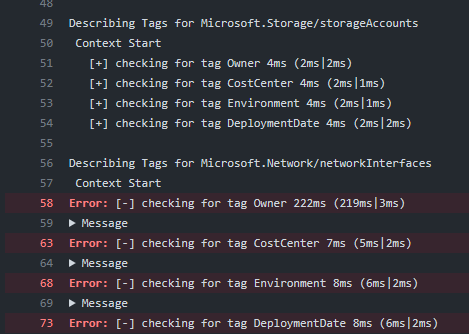
I have made a script that will test with Pester if every resource in a template has the required tags. The script works both with Bicep and ARM templates. It uses the JSON output, so it doesn’t need a connection to Azure. This is the script:
Call locally
You can use the script locally like this:
$Data = @{
    TemplatePath     = '.\main.bicep'
    MandatoryTags    = @(
        'Owner'
        'CostCenter'
        'Environment'
        'DeploymentDate'
    )
    TagParameterName = 'tags'
    TagModuleName    = 'tagging'
    isRunningInteractive = $true
}

$container = New-PesterContainer -Path '.\tests\tags.tests.ps1' -Data $Data
Invoke-Pester -Container $container -Output Detailed
Make this test part of your CICD process
To use this in your CICD pipeline, you store the test in the repository of your templates.
I have added it to a folder called tests.
You can now call it with a custom pipeline task. You do need to build the template before you run the tests, as it needs a json file to work with.
In Azure DevOps, that looks like this:
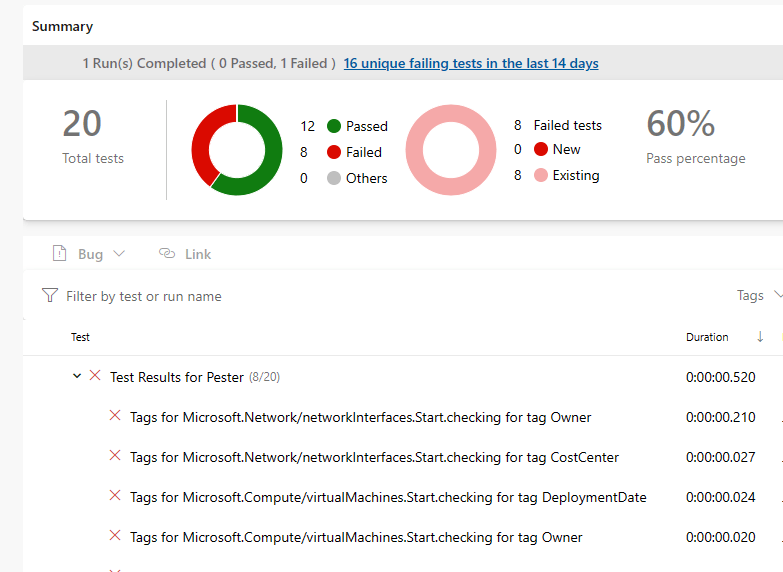
In GitHub Actions, it looks like this:
Conclusion
So that is how you can build and test an Azure tagging strategy with Bicep. To find the full pipelines and content for how this could look in your repository, you can find my GitHub repository for both the naming and tagging strategy. Thank you for reading and If you have any questions, leave them in the comments!
Pingback:Azure Top 5 for January 24, 2022 | Jeff Brown Tech
What do we have in tests.ps1 in the $container variable?
in the container variable, there is a reference to .\tags.tests.ps1, which is the pester file we have been using