In every programming language, you want to prevent duplicate code. Duplicate code means you have to maintain two versions of the same code, which gives a bigger chance of errors happening. In PowerShell, you can prevent duplicate code by using functions and if needed modules. When using Azure Functions, you are able to make use of custom modules to make PowerShell cmdlets available for all Functions. In this post, I will explain how you can add custom modules to Azure functions for PowerShell.
What are modules?
The Microsoft Documentation describes a module in short:
A module is a package that contains PowerShell members, such as cmdlets, providers, functions, workflows, variables, and aliases.
People who write commands can use modules to organize their commands and share them with others. People who receive modules can add the commands in the modules to their PowerShell sessions and use them just like the built-in commands.
There is a public repository for modules, called the PowerShell Gallery. You can use these modules in your function by changing the requirements.psd1 file. But you can also use your own modules. These can be very complicated or very simple, but they are always usable to help prevent duplicate code.
Example: get azure running vms
we will use an example to see step by step how you can add custom modules to Azure functions for PowerShell.
Note: We have two type of functions here. Azure Functions (running PowerShell) and PowerShell Functions (running in an Azure Functions). When I talk about functions, I mean the separate functions that come together in the Azure Function App.
The example we are going to use, is based on one I wrote about before. We want to collect all the VMs in the tenant that are in a running state. But we want multiple functions in one app:
- One function that can be called with an HTTP request and returns the results to the caller
- One function that runs on a timer trigger and stores the results in table storage
These two functions have one thing in common: The need to collect all running VMs from Azure. Instead of having two different instances of that code, we will store that piece of code in a module and use it in the functions.
Note: This is a relatively simple version of a module. A module often contains a lot of different cmdlets that you can use. But for simplicity, we will focus on the placement of the module in the Azure Function, instead of on the module itself.
Prerequisites
- You need an Azure subscription. You can create one for free
- In the subscription, you need to have a storage account with a table, where the results of the timed trigger will be stored. You can create it with the following script (connect to Azure before you start or run it in cloud shell)
- We will use Visual Studio Code. To set it up for Azure Functions, follow this guide.
Start visual studio code project
First, we start an empty project in Visual studio code. Create one according to the guide we used earlier. For the functions, select skip for now.

Add Az module
We will be using parts of the Az module in our custom module. As this module is in the gallery, we can just add it to requirements.psd1. Your file should look like this:
Create two functions
We will now use the menu to create two functions:
- Get-RunningVMs
HTTP Trigger
Authorization level: function - Publish-RunningVMsToTable
Timer Trigger
Leave the cron shedule to the default, as this is mostly used as an example.

Get Storage Account connection string in local settings
To allow the function to use table storage as an output binding, we need a connection string in the function settings.
Locally, we can add them to the local function. I always like to take the lazy approach for this. So what I do:
- Create a new function with the trigger Azure blob storage trigger
- Keep the default name
- Choose to create a new local app setting
- Find the storage account you created before
- Accept the default path
- Remove the new folder BlobTrigger1
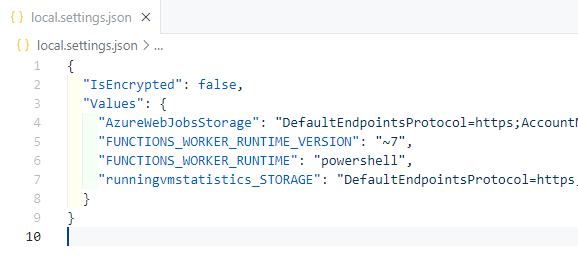
If you now open local.settings.json, you will find a new setting called [strorageAccountName]_STORAGE. We will use that later.
To make the timer trigger work, you will also need to add a value to AzureWebJobsStorage. You can use either a dedicated storage account for the function and one for the table, or use a combined one. For this test, you can just use the storage account you just created. Copy and paste the value from [strorageAccountName]_STORAGE to AzureWebJobsStorage.
Create module folder
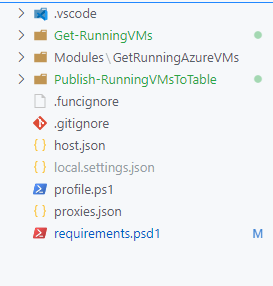
Now we are going to create the module that we will use. First, create a folder in the root called Modules. This is the folder where you can store your modules. You can store multiple modules here. In our case, we will use one module. Create a folder in the modules folder called GetRunningAzureVMs.
Now the structure should look like this:
Add module files
We can now add the module files. At minimum, you need a .psm1 file and a .psd1 file.
For simplicity, you can copy and paste the files I have created. You can find them here.
GetRunningAzureVMs.psm1
The .psm1 fil in this case has one function called Get-RunningAzureVM, which goes through all subscriptions and collects running VMs.
GetRunningAzureVMs.psd1
This is the manifest file, which contains information about the module. It shows what files are part of the module, what version it is running and other information on the module.
By adding these files to the Modules folder, The Azure Function will automatically load the module at start up, so you are able to use the PowerShell functions in the module.
Fill in scripts for functions
Let’s use the PowerShell function in the Azure Function.
Get-RunningVMs
By using the GetRunningAzureVM cmdlet, this becomes a very short piece of code. Replace run.ps1 with the following:
Note: I have left out error handling and verbose output, which you should create for a production environment
Publish-RunningVMsToTable
For this function, you need to change the function.json file so it has an outputbinding for the table in the storage account. Change it to the following:
(don’t forget to change the storage account name and the table name to your own situation)
For the PowerShell script, you again use the Get-RunningAzureVM Function. In this case, you take the results and push them to the table storage. This would look like this:
Test run
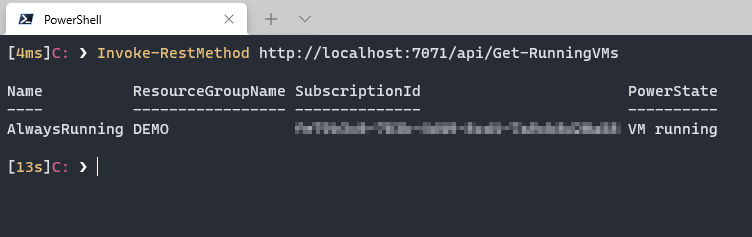
Let’s see if the module is picked up. Start a test run by typing func start in the prompt
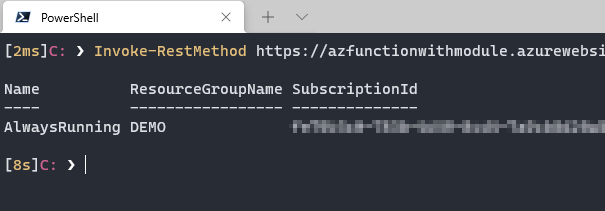
Now if you want to test the HTTP function, you can run Invoke-RestMethod in a different terminal.
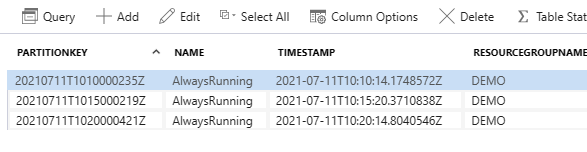
To test the timer function, you can just wait a while and it will be triggered, so you can see the results in the table storage
Optionally: Deploy
You can now deploy the function from Visual studio code. Don’t forget to add the storage account connection and to create a managed identity. The module will still be used.
Conclusion
So this is how you can add custom modules to Azure functions for PowerShell. You can find the complete code HERE in my GitHub. If you have any questions, leave them in the comment section!