Last month, Microsoft announced something that was long awaited for: the public preview of Azure Function Apps with PowerShell support. Although it had supported “experimental languages” in v1, now you can run PowerShell Core and the Azmodule in a v2 function app. Another preview that I have written about before is the YAML multistage pipeline in Azure DevOps. I have combined those previews to create a fully automated deployment. This is how you Deploy Azure Functions with Azure DevOps.
In the previous post, I showed how to deploy a function app in the Azure portal. If you are new to function apps, I recommend you start with that post.
In this post, we take it a step further and automate the deployment of the function app with Azure DevOps. We will use Azure DevOps multi-staged pipelines. Haven’t activated those yet? See this post for more information and how to activate.
Update: As of november 4th 2019, PowerShell is General Available in an Azure Function App. This means it is fully supported and production ready!
The Goal
We will deploy the same Function app as in the Last blogpost. The goal is that all code is sourced in Github and then automatically deployed to Azure. A push to master would change the Function App Code.. I don’t want to create a Function app manually, so I included an ARM deployment. Of course the code and deployment are tested before deployed.
Set up your deployment
Let’s create a deployment. After that, we will walk through the tasks.
Source code
The source code can be found here and it’s also available in the Serverless Library.
This is a very simple function to be used as an example. If you want to know more about the components, please view the previous blogpost.
Preparations
Copy or fork the source code to your own Github repository.
You need to change the following in azure-pipelines.yml:
- the functionappname on the 3rd line. This string needs to be unique globally!
- The azureconnection on the 4th line. This needs to be the name of your Azure Connection in Azure DevOps
- The resourcegroupname where the Function app will be deployed to. If it does not exist, it will be created
After that is done, move to Azure DevOps and choose a project that already has a connection with Azure setup (or create a new one). This connection needs to have owner or user assignment permissions to the subscription, because it will provide the Function App with the right permissions.
Quick setup
Select pipelines and choose “New pipeline”. Select GitHub as the source

If you have not connected before, you will be asked to do so now. If you have connected before, choose the repository you just created. It should open the YAML file as soon as you click it. If you select Run, your pipeline will be in place and you are basically done.
This pipeline will perform the Build part on every commit, and deploy when Master is updated.
The pipeline
Let’s take a look at what all the different parts of the pipeline actually do. The code underneath just shows the identifying parts, you can get the full code from the Github repository.
Overall settings
name: DeployAzureFunction
variables:
  FunctionAppName: 'ffffa'
  AzureConnection: 'MPN'
  ResourcegGroupName: 'RG_ffffa'

trigger:
  branches:
    include:
    - '*'
The variables are defined here. The trigger defines that the pipeline should run at every commit to every branch
Stages
stages:

- stage: Build
  jobs:
  ...
- stage: Deploy
  condition:
    and(succeeded(), eq(variables['Build.SourceBranch'], 'refs/heads/master'))
  dependsOn:
    Build
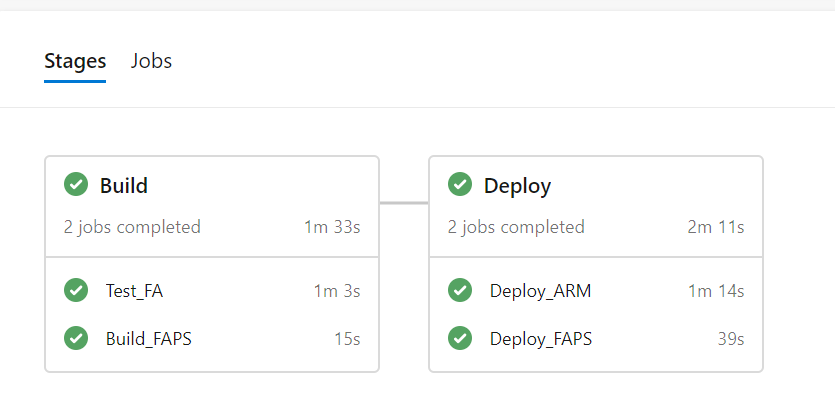
The pipeline is separated into two stages: Build and Deploy. The Build-stage will always run, the Deploy-stage has the condition that the branch is master and will not run if Build hasn’t run.
Job: Test_FA
  - job: Test_FA
    pool:
      vmImage: windows-2019
    steps:
    - task: AzureResourceGroupDeployment@2
      displayName: 'Test ARM Deployment'
    - powershell: |
      displayName: 'Install Pester and import module'
    - powershell: |
      displayName: 'Invoke-Pester'
    - task: PublishTestResults@2
      displayName: Publish Test Results
This job takes care of all testing. First, it tests the ARM template deployment against Azure. After that it installs Pester and invokes it to test the PowerShell script in the function. The last step publishes the results in the pipeline. See this blog for more explanation around the Pester tests in Azure DevOps.
Job: Build_FA
  - job: Build_FA
    pool:
      vmImage: windows-2019
    steps:
    - task: ArchiveFiles@2
      displayName: 'Archive FunctionApp'
    - task: PublishPipelineArtifact@0
This job puts the function files into a ZIP-file so they can be deployed.
The ZIP-file is then published to the pipeline so it can be used in a later stage. In the old system with a separate build and release, you would have chosen the task Publish Build Artifact. But with a multistage pipeline you can make use of this task.
Job: Deploy_ARM
  - job: Deploy_ARM
    pool:
      vmImage: windows-2019
    steps:
    - task: AzureResourceGroupDeployment@2
      displayName: 'Deploy Azure Resources'
    - task: AzurePowerShell@3
      displayName: 'Set FA Permissions'
The first task will deploy the Function App through Azure. It is set to incremental deployment, so it will not recreate the function app every time new code is pushed. After that the PowerShell script will assign the right role assignment to the App so it can help manage Azure. In this case Reader rights are attributed. You might want to expands those permissions if you want to run a different script.
I used this template as a source for getting the ID in the output of the ARM template and using it for the permissions.
Job: Deploy_FA
 - job: Deploy_FA
    dependsOn:
      Deploy_ARM
    pool:
      vmImage: windows-2019
    steps:
    - task: DownloadPipelineArtifact@0
    - task: AzureFunctionApp@1
      displayName: 'Deploy Azure Function'
This task collects the artifact that was created in Build_FA and uses the AzureFunctionApp-task to deploy the code to Azure. I has a dependency on the ARM deployment, as it cannot run when the Function App is not present.
Results
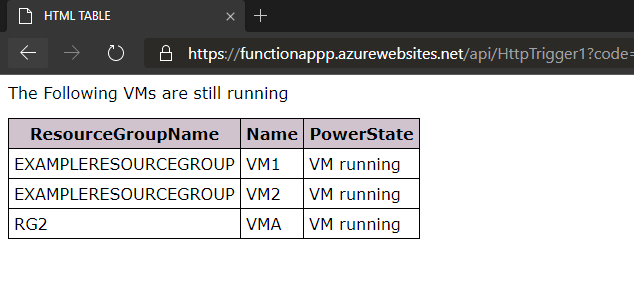
After running this pipeline, the Function App is deployed and running.
Every time the code is updated in a branch, the tests will run. Every time master is updated, the deployment to Azure will be rerun. So now you can Deploy Azure Functions with Azure DevOps in a fully automated way that can be duplicated in a very short time.
hi, i cloned the repo and deployed the whole repo in my own azure devops organization but on invoke-pester stage i keep getting this https://imgur.com/a/j3mEzy8 error, and if i remove that stage including the condition and depends on in the YAML, i’d get this https://imgur.com/a/14Gm7Wd error could you please help? thanks
Hi Andre,
I looked at it and this happens because the Pester testing step was written for pester 4. The pipeline downloads Pester 5, which causes the error.
I need to rewrite the testing to fit Pester 5. As a workaround for now, I have changed the task in the GitHub repository to Install Pester version 4.
It should now work again.
Pingback:Weekly Newsletter – PowerShell Digest #014 - Software Mile.com