Last weekend, I did a talk called Azure DevOps for the IT Pro at the Scottisch Summit in Glasgow.
I have done this talk before and I found that people are surprised with the possibilities Azure DevOps can offer them that they hadn’t considered. So I figured it is time to create a blog post. With this post, I want to give you a small overview of the options that Azure DevOps has to offer you. I want to combine these with tips from my own experience and links to practical guides to get you started.
The basic structure: Organizations, Projects, Teams
To get an overview of the structure, I made a picture.
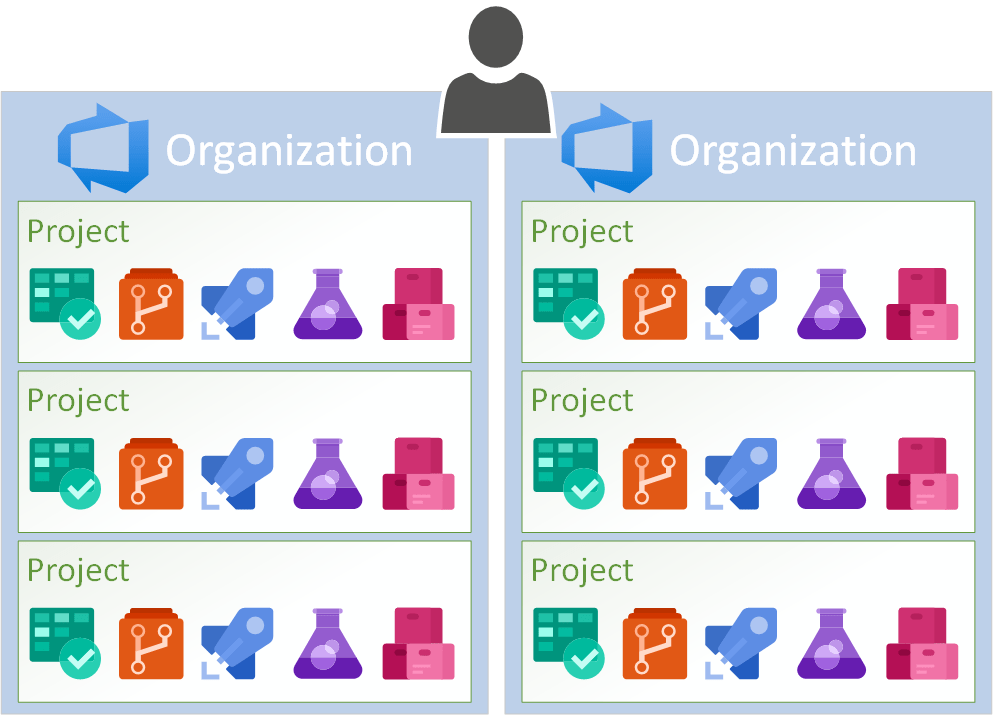
The biggest entity in Azure DevOps is the organization.
This is where all your projects, resources and accounts are located. This doesn’t mean that you can only have one organization associated with your account though, you can create or be member of multiple organizations, which can all connect to Azure Active Directory.
Within the organization, you can create a project. In each project, you can make use of the various services that Azure DevOps has to offer: Boards, Repos, Pipelines, Testplans and Artifacts.
I recommend starting with one organization, as you will not get much benefit from a second one while you are just starting out. You can always create more if you feel the need.
When it comes to creating projects for production, it is important to think of a good strategy. You can use a project like the name says, for every project you do. You can also create different projects for different teams.
In my experience, you should prefer less projects over more projects. It is completely possible to run a big organization from a single project, if that works for you. Do keep in mind that for example a connection to Azure is available for everyone who has access to the project.
Sources
Services in a project
There are different services available to make use off. Let’s walk through them.
Boards
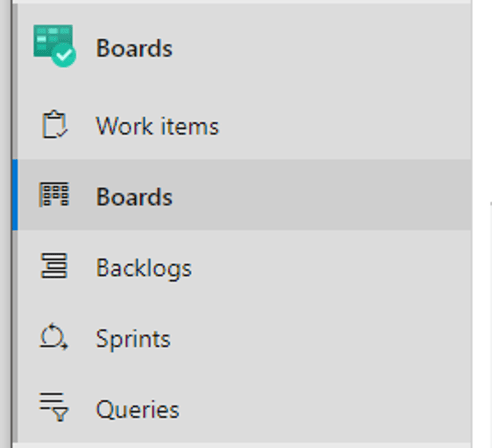
In a nutshell, the boards provide you with planning tools. This is mostly based on the principals of Agile (or scrum).
Agile is a lot bigger than just a planning tool, it is a complete philosophy around team processes. But if you are just getting started, this might be a bit overwhelming . Good to know that you could consider the boards as an incredible extensive to do list, if that fits better to your needs.
Agile, Scrum… or Basic
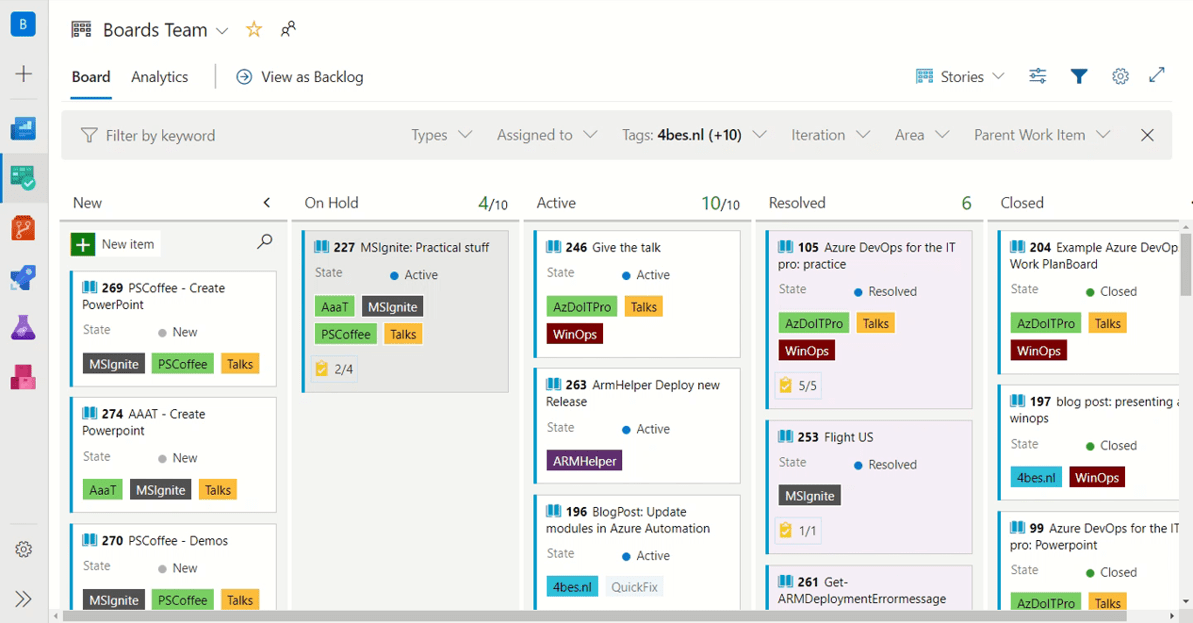
There are a lot of features to help you with planning your teams tasks or your own tasks. While there are a few options available, let’s just consider the kanban boards (just called boards in the menu). Want to keep it simple simple simple? Use the basic interface:

As you can see, you get three columns in the boards. You can drag each object to the appropriate stage.
Note: You can choose between Agile, Scrum and Basic when you create a project. It is possible to change this later though.
From this interface, you can start playing around with all the options. By using colored columns, tags, custom columns and tasks you will start to see what works for you and what doesn’t. This is an example of my personal tech-board, where I was planning my talks, blog and scripting last year.
One thing that I really like about the workflow that supports this structure, is that you work with a backlog. This means that you separate the current items from the items that are lower priority. The idea is that you take a fixed time period and decide what items you will be doing for that period. This also means that you don’t have to look at the other items, which brings some peace of mind. Of course this is your world, so if you want to change these things up a bit, feel free to do so!
Sources
Repos
Repos in Azure DevOps come in two shapes, TFVC and GIT. Because I think GIT is more useful for most IT-Pro tasks, I will focus on that.
So the repos are a git provider. If you work with GIT, you can store all your scripts here. If you do not work with GIT but you do work with code, you should use GIT! It will make a big difference in your own version control and later in your collaboration within your team.
So what Azure DevOps can offer you is a provider that is connected to all the other services, which can make auditing easier. But if you prefer another provider, like Github or Bitbucket, you can use that as well and connect it to the pipelines for example.
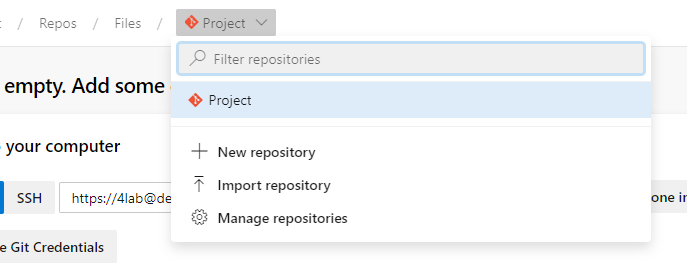
Repo -ne project
There is one thing that is sometimes overlooked, and that is that you can have multiple repos in one Project. The interface isn’t very clear on that. When you open the repos, it shows your main repo. But by clicking the arrow at the top, you can create more repositories within that project. I recommend considering this before creating a new project for a new repository.
Note: Would you like an overview of all the repositories so you can view and manage them there? Upvote this suggestion
You can use Git for almost any file. Does this mean you should? No. GIT is not optimized for larger files or for example Office files. But should that stop you from using it? Absolutely not. If your documentation are doc files and you need those to stay with your scripts, there is no issue in storing those docs in a GIT repository.
My advise on GIT is to take it slow. Allow yourself and your team time to get used to the concept, because it is easy to get lost. I have been working with GIT on a daily basis for a few years and I still don’t know all the options. I found it easiest to just get started with what I knew and learn what I needed on the way. When you get more used to it, there are features that will help you with code quality, like branch policies, pull requests and reviews.
Sources
Pipelines
By using the CICD pipeline, you can perform automatic testing on your code and after that deploy it automatically to production.
A pipeline is a series of tasks that are executed on an agent, which is a VM or a container. You can create your own agent, or use one of the agents Microsoft has made available. All these tasks would otherwise be done manually or not at all, so it can be a real time saver and improve quality. A pipeline will often consist of a build stage and a release stage. These can be automatically triggered with code changes, or manually as needed.
Multistage vs classic pipelines
In May 2019, multi-stage pipelines were introduced. When using those, you can capture your complete pipeline in a YAML file, which makes it easier to reproduce. This option is still in preview, but has been very stable in my experience.
I recommend to get started with the classical editor and interface, as it is easier to visualize the process that is going on. When you have a bit more experience, the YAML pipeline is the way to go.
Sources
Create a build and deploy pipeline for ARM Templates (Classic builder)
Build
In the build stage, the files are prepared for production. Now while this stage is important in Software development, you don’t always need it for IT-Pro tasks. There is another part of the build stage though, and that is testing.
By automating your tests, you can save a lot of time when you make changes to a script. The automated tests can prevent you from deploying a mistake to production.
With PowerShell, you would use pester testing. For for example ARM templates you can do validation, run ARMHelper, or create your own pester tests. In the end, you can get a nice report that tells you if your tests have past

If you are just getting started with pipelines and testing, it can feel like a lot of work. This stuff can be tricky to get into for the first time. I recommend to keep thinking about the return on investment. Your code quality will improve, your feature implementation will be a lot faster and you have less risk of deploying mistakes to production. It is absolutely worth it.
Release
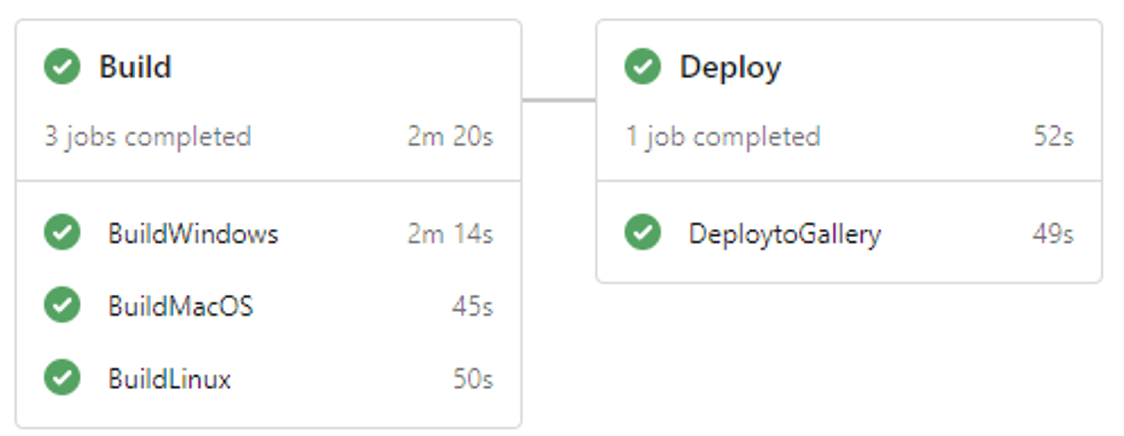
In the release stage, you will be done with testing and ready for production. At this point, you can use the pipeline to deploy directly to production. This can be done to Azure for example through a service connection. But there are other options available.
This for example is the pipeline that pushes my PowerShell module ARMHelper to the PowerShell Gallery
You can also deploy directly to an on-premises environment by installing your own agent.
There are a lot of options to have a secure deployment process that is auditable and requires less effort.
Sources
Create a connection to Azure
Conclusion
While Azure DevOps is not originally intended for the IT-Pro, I think a lot of value lies in it for a lot of different teams. With these tips, I recommend just getting started and see where it brings you. Azure DevOps is a large product and you need to make it your own. Make Azure DevOps work for you.
Now I have covered some of the pointers of my talk, but there is some more to it. I will be submitting my talk to future conferences, so hopefully more people will get excited about Azure DevOps. If you would like this talk for your conference or User group, you can contact me through the contactform or Twitter :). If you have any suggestions or questions, leave them in the comments!
I’d love to see some breakdown of the most popular extensions here.
That is a good idea Matt, I will put it on my list for the future. Thank you!
Thanks so much for sharing this. It’s just what I was looking for and has been incredibly useful.
DevOps Training In Bangalore