UPDATE: I have been working on this script and it can now be found in the Gallery!
So if you just want to know about the script, see my post about the new version. This blogpost is still useful if you want to know about the thought process
This week, I had some time off to enjoy the holidays.
So naturally, I was playing around with Powershell, just nice relaxing code. I found something on my computer had to be done manually and it was bugging me. So, a New Powershell Challenge is born. No rules, no risks, just a goal to reach, Google available and let’s try to see how far we can come.
(just looking for the script? Scroll all the way down or find it here.
The plan
I have been working with Powershell Core for some time and love how it keeps getting better and better. I do forget to install new versions. Even if I hear about it on Twitter, I’ll procrastinate and then I’ll forget.
So what I want, is a script that I can run as a scheduled task. It has to check my local version of Powershell and compare it to the last available version available from the Powershell-Github. If they are different, I should be notified and able to install it right there and then. Some manual action is ok, as long as it is close to next-next-finish.
At this point, If you like a challenge I encourage you to stop reading and try to build this on your own. Do share results in the comments!
The different elements
Let’s break the goal down into subgoals:
- Get the installed software version
- Get the latest version from the powershell Github
- Compare the two and set an action if they are different
- Create a notification that asks user input to install the new version.
- Install the new version
- Do this all for the regular version and the preview version, as I run both on my computer. My first thought is that this should be a switch-parameter.
The first challenge: testing
Something that I didn’t think about when I started: testing. My computer was all up to date. There was no installation to be done, so I could only test the three two steps. Lucky for me I had a few busy weeks at my job and my work-laptop was still a few versions behind. On top of that, I had an msi-file for an old version of Powershell Core Preview in my downloads-folder. So all testing could be done that way.
Get the installed Software version.
There are two ways I could think of to check currently installed software on a computer: Check the registry, or use WMI.
The command for WMI is quite straightforward:
Get-CimInstance -ClassName Win32_product | where-object {$_.Name -like "*Powershell 6*"} |
Select-Object Name, Version
(Click here for the reason to use Get-CIMinstance instead of get-WMIobject)

The other way is through the registry. The initial line is a tiny bit more complicated, as the programs are sorted by their IDs instead of their names. It took some Googling to get the right syntax, which I got mostly from pages like this one and a bit of trial and error.
Get-ItemProperty HKLM:\SOFTWARE\Microsoft\Windows\CurrentVersion\Uninstall\* |
Where-Object {$_.DisplayName -match "PowerShell [0-9]-x" } |
Select-Object DisplayName, DisplayVersion

So the output in this case is basically the same.
I tried to find out if one of them is better in the sense of “more correct”. I couldn’t really find a straight answer. So I looked at another aspect:

Checking the registry takes far less time.
To make it possible to check the preview-version separately, I set it up with a variable for the name. So now it looks like this
Get the latest version from the powershell Github
This wasn’t too hard, as I had set it up before for my script to install powershell Core (my very first blogpost). Since then, I had learned about a script in the Powershell Github to install Powershell, that uses a better way than my own script.
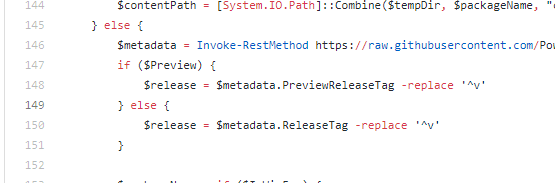
So that metadatafile has the information I need and the $Release-variable is almost exactly what I need.
Als you can see, I combined the if-loop for the $Preview-switch so it handles the local version and the release at the same time.
After that I just had to remove the “preview”-string from $release and now I have two values in more or less the same format that are ready to compare: $PwshCurrent and $Release
(This is also the point where I realize my variables don’t have the best names. But trust me: I’ve done a lot worse. I fixed it in the final script.)
Comparing the local version to the latest release
This is a very basic loop on it’s own.
If ($A -notlike $B){
    Invoke-Panic
}
Else {
    Suspend-Panic
}
I wrap it in another-loop that states that $PwshCurrent must have a value. This is because I don’t want this script to run when no local version was found. The result is this:
I use Return to make the loop stop at that point, as no action is needed.
I did think about using -lt or -le or something like that for the comparison, as it’s more precise. But I couldn’t think of a case where the version online would be older than the one on the computer. So this is good enough.
Create a notification: BurntToastModule
The easiest way to do this to me is with the wscript popupmethod, as descriped here.
I have used it before and it is quite easy to use, but it’s also quit old and Windows 10 comes with Toast notifications that look so much better
So I played around with the BurntToastModule. I got some great results.
$PSbutton = New-BTButton -Content "Update now" -Arguments ".\start-update.p1" -activationtype protocol
$Dismiss = New-BTButton -Dismiss

New-BurntToastNotification -Text "A new version of Powershell Core is available" -Button $PSButton, $Dismiss
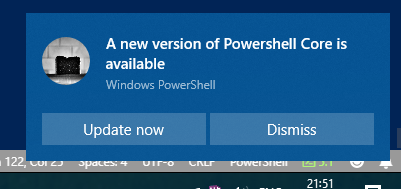
Only one tiny problem: The “update now” button doesn’t work.
I have searched within the module, I have searched outside of the module, I have messed around with the registry as suggested here, I could not get the button to run a Powershell Script (or an MSI for that matter).
Create a notification: wscript
I eventually gave up as I was getting frustrated. I moved back to the wscript-method, which is quite easy when you keep this page) next to your script.
So with the if-loop from the last step, I can take that output and turn it into a popup.
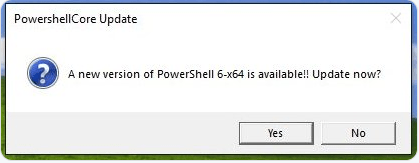
As you see I have set a variable to show what program it checked, so it will give a different output when $Preview was active.
When you use a popup like this, the output will be integers, as shown in the page I linked earlier.
If yes is pushed, the output will be 6. This means that the action when yes is chosen can be handled within the script.
if ($InstallUpdate -eq 6) {
    Set-Thingy
}
Else {
    Set-Nothing
}
Install the new version
As I said before, this was the subject of my first blogpost.
After I published that, I was alerted that the powershell Github has a script for just this goal. And it’s a lot better than my script.
My timing was good though, as the script had just been updated to include preview-versions and MSI-install.
So I copied the script to my computer and called it from my script:
if ($Preview) {
    .\install-powershell.ps1 -UseMSI -Preview
}
Else {
    .\install-powershell.ps1 -UseMSI
}
This gave two issues when the script was completed:
- The install would run fine manually, but not when a scheduled task was used
- The install would run, but something was off with the installation. The new version would not function until a repair was done.
Update 29/3: The install-script has since been changed and doesn’t require to uninstall the old version before installing the new version. Inspired by Thomas Maurer’s post, I now use the following install-line. This also means that you don’t have to keep a second script on your computer. I have left this piece of the blog because it was a learning experience, but all the scripts have been updated.
Invoke-Expression "& { $(Invoke-RestMethod https://aka.ms/install-powershell.ps1) } -UseMSI"
For the first issue, I set up a try-catch to get the error message. It turns out that the scheduled script was running in a different folder, which made sense. So I changed the lines to include the full path.
The second issue was with the new install and the old install not working together very well. The old version still exists on some level, which made the new release unstable.
I could have spend more time to investigate what’s going on, but I found that there was no problem when you uninstall the old version before installing the new one. As I didn’t see a downside to this approach, I went for it.
Uninstall the old version
It’s quit handy that we have used the registry to get the current installation, as the registry key contains a property “Uninstallstring”.
When this string is ran in CMD, it will uninstall that program.
So I added Uninstallstring as a property to $PwshCurrent.
$PwshCurrent = Get-ItemProperty HKLM:\SOFTWARE\Microsoft\Windows\CurrentVersion\Uninstall\*  |
Where-Object {$_.DisplayName -match "$PwshName" } |
Select-Object DisplayName, DisplayVersion, UnInstallString
To run this from Powershell, you need to start CMD from the script. (or play around with getting the value so you can run msiexec.exe from Powershell, but I found this actually makes things more messy.)
Google led me to this site and I came up with this:
Start-Process -FilePath cmd.exe -ArgumentList '/c', ($PwshCurrent.UninstallString) -NoNewWindow -Wait
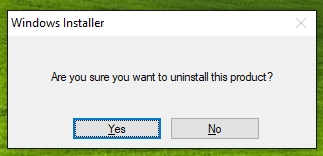
This uninstalls the current version. It does ask for confirmation though.
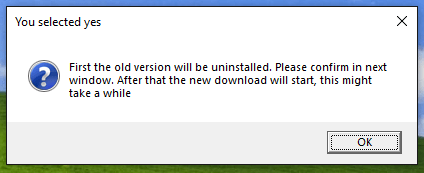
I played around with the msiexec.exe-options as explained on This site, but the quiet options didn’t seem to work well. As I don’t really care about pushing a button, I left it like it is and actually added a popup to announce the confirmation
$alert.Popup("First the old version will be uninstalled. Please confirm in next window. After that the new download will start, this might take a while", 0, "You selected yes", 32)
So the whole installation now looks like this:
Put it all together
I wrapped the lines in a function I called Get-PwshUpdates, with a switch parameter for $Preview
At the bottom of the script I called it twice, once for the regular version, one for preview.
Get-PwshUpdates
Get-PwshUpdates -Preview
I saved the script and set up the scheduled task. The task starts a program. It then runs Powershell.exe with the following arguments:
-windowstyle Hidden -command "C:\scripts\Get-Pwshupdates.ps1"
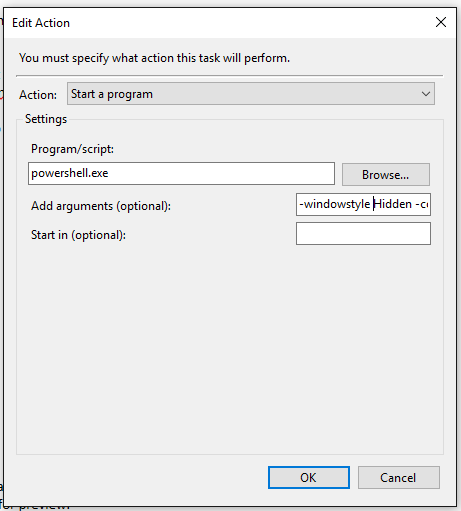
The task needs highest privileges for the installation.
Update: For some reason, on my homecomputer this task completes with an error. The only obvious difference between the two devices is the executionpolicy, but another scheduled script did’t have issues. For my home computer, I use these arguments:
-ExecutionPolicy Bypass -windowstyle hidden -file "C:\Scripts\Get-Pwshupdates.ps1"
The final script
So this works! All I have to do is push yes, ok, yes, next,next, finish (and of course carefully read the License agreement).
(pause between the gifs as I was on a holiday with a bad internetconnection, so the download took ages)
This is the final script:
All in all, a very fun experience and I actually created something useful. But mostly I gained knowledge and found some things that might be worth contributing to in the feature, when I feel like actually working neatly :-).
If you know a better way to accomplish these goals, please let me know in the comments!
Get the installed Software version: Throws an error on my system using PS5.1 or PS7
Get-ItemProperty HKLM:\SOFTWARE\Microsoft\Windows\CurrentVersion\Uninstall\* | Where-Object {$_.DisplayName -match “*powershell 6*” } |
>> Select-Object DisplayName, DisplayVersion
OperationStopped: Invalid pattern ‘*powershell 6*’ at offset 1. Quantifier {x,y} following nothing.
Changing the pattern to:
Get-ItemProperty HKLM:\SOFTWARE\Microsoft\Windows\CurrentVersion\Uninstall\* | Where-Object {$_.DisplayName -match “.*powershell \d.*” } |
>> Select-Object DisplayName, DisplayVersion
Get-ItemProperty: Unable to cast object of type ‘System.Int64’ to type ‘System.Int32′.
These errors result from some problematic registry entries.
In the end I used:-
Get-Item HKLM:\SOFTWARE\Microsoft\Windows\CurrentVersion\Uninstall\* | Where-Object { $_.GetValue(“DisplayName”) -match “.*powershell \d.*”} | Select-Object -Property @{N=’DisplayName’;E={$_.GetValue(‘DisplayName’)}},@{N=’DisplayVersion’;E={$_.GetValue(‘DisplayVersion’)}}
DisplayName DisplayVersion
———– ————–
PowerShell 7-x64 7.0.3.0
PowerShell 7-preview-x64 7.1.0.7
Hi Pianoboy,
I see you are correct, the cmdlet to get the installed item has some issues. This is a small syntax error combined with the fact that since this post, PowerShell has moved on to version 7.
I have made a productionversion of this script where I have fixed the issue by using the following code:
$PwshCurrent = Get-ItemProperty HKLM:\SOFTWARE\Microsoft\Windows\CurrentVersion\Uninstall\* |Where-Object { $_.DisplayName -match "PowerShell [0-9]-x" } |
Select-Object DisplayName, DisplayVersion
I have changed this in this example as well, thank you for letting me know about the issue!
You can find the working production version of the script here