There are a few ways to make it easier to create a new ARM Template. For example:
- Quickstart Templates
- Microsoft Docs
- Azure Resource explorer
- Visual Studio
- A generated template from the Azure Portal.
In this post, I want to dive a little deeper into that last option. In my opinion this is an incredible easy method to get what you need. You just combine all the settings you need in the portal, click ‘Export Template’ and you have a template ready to go.
There is just one problem and that is that the templates, being generated, can be messy. There are unneeded parameters, there are variables that just copy a parameter and values that should be flexible are hard coded. So you need to do some cleanup.
There has been a lot of investment in this feature and I must say the generated templates have gotten better and better over time, so this post might become obsolete at some point. But I also want to challenge you to think about your strategy and design choices when using infrastructure as code, so every template can become readable, reusable and efficient for your needs.
Let’s look at how we can make those generated ARM templates production-ready. We are going to use an example of some resources so you can see the cleanup actions you could do. Some of these are best practices, some of these are preferences. I will explain my choices as I make them.
The request
I got a request to create a template that deploys the following Resources to Azure:
- A VM with these requirements:
- OS: [smalldisk] server 2019
- Size: D2s v3
- Extension: Antimalware extension
- No boot diagnostics
- a 60GB datadisk attached
- All Premium SSD
- The VM had to be in a dedicated subnet and virtual network, using a dynamic private IP
- The VM had to be in a dedicated availabilityset with default values
- The deployment has to be simple with as little parameters as possible. Flexibility is not needed.
- For naming convention all resources should have a name based on the name of the VM.
Planning a strategy
This step is easily overlooked. It can be skipped if you just want to create one deployment and never look at the template again. You could just use the portal for that though. If you want to use Infrastructure as Code on a bigger scale than that, here are some things you could think about.
One template or more templates
When you plan for automation, the first thing to think about is the needs of the ones who will be maintaining it. With ARM Templates, you can give every resource a dedicated ARM template. You might use Azure DevOps for the deployment or nest all the templates into one. The advantage of this is that every resource can easily be replaced on its own without touching the other resources. The downside is that your automation gets complicated, especially in large environments. At that point it can be your preference to have all resources in one template.
For small deployments, It can be easier to put all resources in one template, as it provides a simple code setup that is easy to maintain.
Don’t forget to consider the resource life cycle. Resources in a template should not have a different life cycle if you want to make full use of Infrastructure as Code.
Looking at the requirements of this deployment, simplicity should win and I want to put them all in one template.
Parameters, variables or hard coded options
There is no best practice for how many parameters you should have, it is more important that you know why something is a parameter. Do you need flexibility for a value? When you talk about a VM, do you want one template to deploy all your VMs? Or is there a way to group VM-properties so you can create a few templates? More parameters can mean more mess, more time for each deployment, more room for error. But it can also mean fewer templates, more standardization.
When using variables, think about if it is needed to use it. What are you trying to accomplish? Simplicity because it is called more than once? But don’t forget about readability. When someone reads a template, the parameters and variables are the first things they will probably see.
In this case, there was no need for flexibility at all. So let’s take the challenge of creating this all in one template and get rid of as many parameters as possible.
Getting the Examples from Azure
You have two options to get the templates from Azure: Through an existing resource or by taking the steps to create a new one.
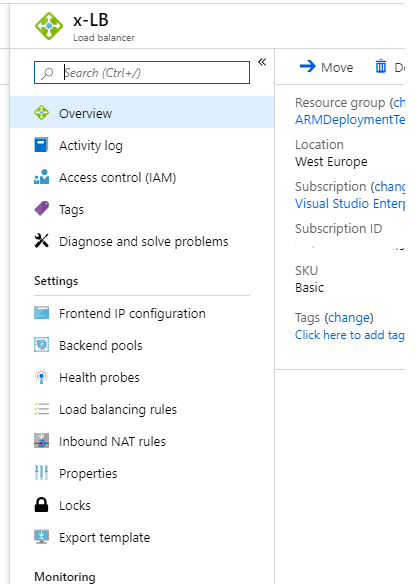
To get a template from an existing resource, go to the resource in Azure and click “Export template”
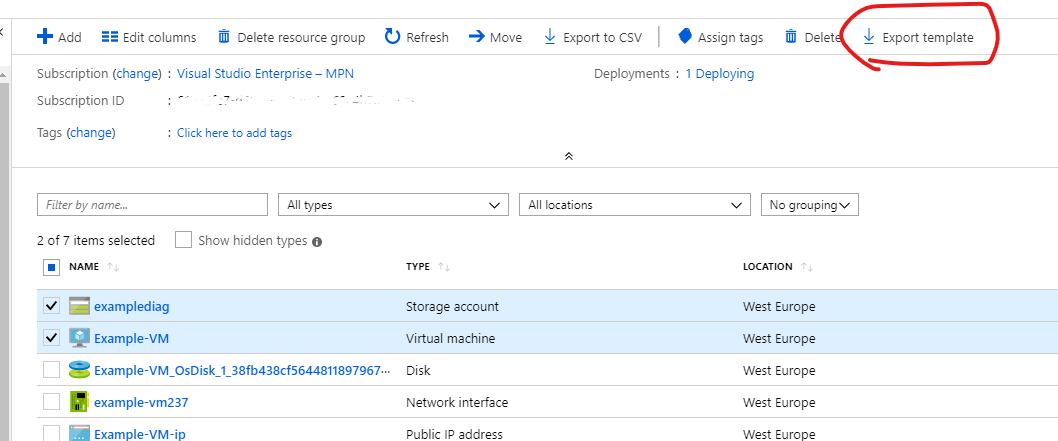
A new feature is that you can go to a resourcegroup, select the resources you need and click Export Template at the top. It will combine these resources in one template
The other option is taking all the steps to create the resource, except actually creating it. I’ll use this method for the example.
To get all the requirements that are needed, we just need to use the steps to create a Virtual machine. All the other resources are part of the deployment in the portal.
You can even create a new Virtual Network and Availibility set there by selecting “create new”. I select everything I want, move to “review and create” and instead of Creating the VM, I click “Download a template for automation”

The templates
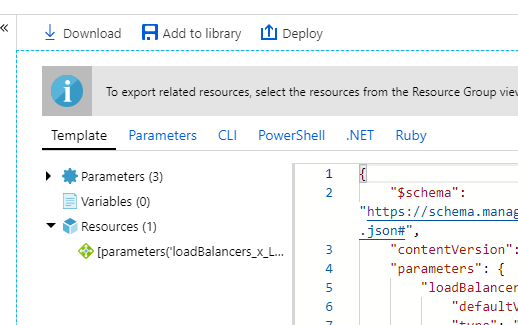
So in both ways, you are directed to a screen with a few options. You can download the templates, add them to a library in the Azure Portal or deploy them at this point. You also get some options that give scripts for deployment in a few languages
My preference is to copy and paste the contents of the Template and the Parameters to two json files on my computer.
I save those in files called azuredeploy.json and azuredeploy.parameters.json as I like the consistency. This is a personal preference though, you are free to name it whatever you like.
Cleaning up the template
You can find the files we will be working with at my Github. You can follow along if you like.
Tools
Open up the files in Visual Studio Code. There are a few very useful extensions and tools we can use.
- Azure Resource Manager Tools
This helps with Syntax highlighting, IntelliSense and error handling - JSON Tools
This helps with formatting of the JSON-files, just use Ctrl(Cmd)+Alt+M after you are done to make it neat. - ARMHelper
A PowerShell-module I created to test ARMdeployments.
First error handling
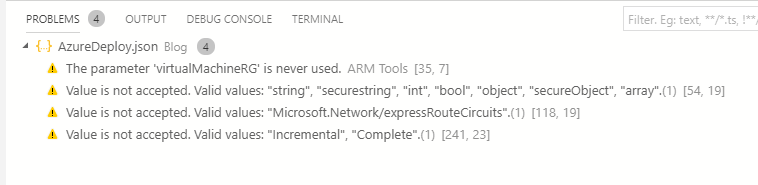
Opening the templates in Visual Studio Code, I can see the first green squiggly lines already. This means your code wouldn’t fail, but you are not using best practices. It’s a warning, where red lines would represent an error. But we want to use this code in production, so they should be checked. You can see all of them in the Problems-section
The challenge when you are getting started is finding out why they are there. Some of these are because of bugs in the template, some because of bugs in the extension in Visual Studio Code.
Some tips & tricks
- Azure and vsCode do not always agree on the use of capitals. You can change the formatting to get rid of the warning-lines, but it’s a personal preference.

- Sometimes VSCode says the API version is wrong. As a rule of thumb, you always pick the latest version available. If you are in doubt, you can find the latest versions for all resources here
- There are some bugs where the error message isn’t very clear. For example, we have created a public IP and the error message is this:

That doesn’t make any sense and it is actually a bug. The problem is capitalization again. If you change the P to a capital, the warning will disappear.
So now we just have a parameter that is never used. We don’t need it, so lets remove it.
Validate the template
With these warnings out of the way, let’s try some validation

Alright, that’s fair. When you add a value for AdminPassword the validation works.
Let’s see what would actually deploy.
I am using ARMHelper to see what resources would be deployed
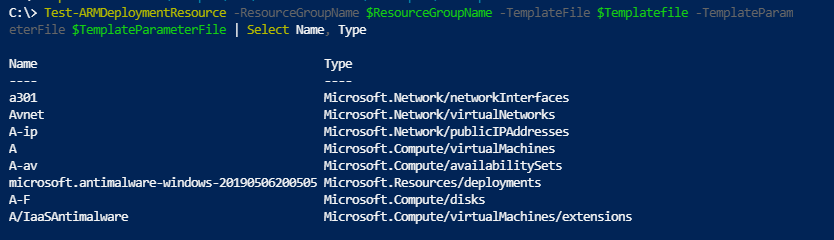
Well, it works, it would function, there is no issue in it. You can absolutely deploy it. But it has 19 parameters and gives a lot more flexibility then we want or need. Like I said before: it’s completely fine for a onetime deployment. When you use infrastructure as code in your production-environment, this will not do.
Getting it ready for production
Let’s go through some simple fixes for these templates.
Location
The first parameter is location, which is a string. There is a trick for location though:
[resourceGroup().location]
When you use that, the resource uses the same location as the resourcegroup it is placed in, providing a very clean structure.
When really applying best practices, you would define this in the parameters and call that parameter at every place the resource is needed.
So replace the parameter “Location” with this:
"location": {
    "type": "string",
    "defaultValue": "[resourceGroup().location]"
}
Now you do have the option to set a different location without changing the template. If you don’t define a custom location, it will use the default value.
(I will place the location parameter at the bottom of all parameters, I always do as it looks clean, this is a preference)
Hard coded values
There are some values that don’t need the flexibility of a parameter and can be used hard coded. This will often refer to types or sku’s. To run some consistency in your environment, you will want some values to be the same across all resources or limit the choice to a few options.
For example, in this template the sku of the publicIPAddress is a parameter. Let’s change it to a hardcoded value.
"sku": {
    "name": "Basic"
},
Now you can remove the parameter.
You can also choose to put this value into the variables, so it is clear for the reader that a designchoice has been made without the intention of changing it.
I personally don’t really like it when there is a very long lists of parameters and I read every template I deploy fully, so my preference is to hard code it within the resources.
In this specific case, The challenge was to have at little parameters as possible. Simplicity above flexibility. So I change all parameters that are not names to hard coded values.
Arrays and objects in Parameters
I want to mention this option in the template. I’m removing it, but it is a very nice format.
In the generated template, there are two arrays. Within the arrays there are objects. Let’s look at datadisks for example
"dataDisks": {
    "type": "array"
},
When you look at the parameterfile, you will find this
"dataDisks": {
    "value": [
        {
        "lun": 0,
        "createOption": "attach",
        "caching": "None",
        "writeAcceleratorEnabled": false,
        "id": null,
        "name": "A-F",
        "storageAccountType": null,
        "diskSizeGB": null
        }
   ]
},
The template calls these values in this way
"copy": [
    {
    "name": "dataDisks",
    "count": "[length(parameters('dataDisks'))]",
    "input": {
        "lun": "[parameters('dataDisks')[copyIndex('dataDisks')].lun]",
        "createOption": "[parameters('dataDisks')[copyIndex('dataDisks')].createOption]",
        "caching": "[parameters('dataDisks')[copyIndex('dataDisks')].caching]",
        "writeAcceleratorEnabled": "[parameters('dataDisks')[copyIndex('dataDisks')].writeAcceleratorEnabled]",
        "diskSizeGB": "[parameters('dataDisks')[copyIndex('dataDisks')].diskSizeGB]",
        "managedDisk": {
                "id": "[coalesce(parameters('dataDisks')[copyIndex('dataDisks')].id, if(equals(parameters('dataDisks')
 [copyIndex('dataDisks')].name, json('null')), json('null'), resourceId('Microsoft.Compute/disks', parameters('dataDisks')[copyIndex('dataDisks')].name)))]",
                "storageAccountType": "[parameters('dataDisks')[copyIndex('dataDisks')].storageAccountType]"
                }
            }
        }
    ]
},
This is a really smart way to create a template for a VM that could contain multiple disks. You will not have to change the template itself, only the parameters. Some of these can still be hard coded and they will still create the amount of disks you define. Like hard coding createoption and writeAcceleratorEnabled.
I’m going to take this logic away as it isn’t needed for my use case, but consider to keep it if it fits your needs.
Choosing a naming strategy
Within the template, you can make use of variables to create a naming strategy where all resource-names are based on one base. In this case, all resources in the template are contributing to the one resource we actually need: the VM. So we want to base all names on that VM-name.
This would be the point where I would talk with the customer about their choices, as it means the vnet, subnet and Availabilityset are now dedicated to this one VM, which might not be the best use of resources. There are some other options like creating the vnet, subnet and availabiltyset in a different template, numbering the VM so it is easy to add another or have an extra parameter for Availibilityset.
To keep it simple, let’s say the customer made the choice to still have all resources dedicated to the one VM.
After changing all parameters to variables, you should have something like this
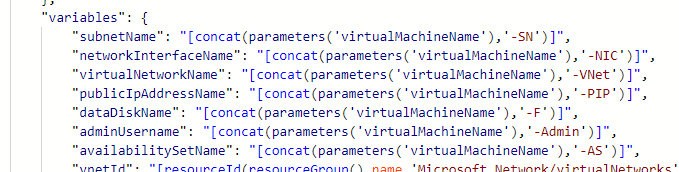
Clean and readable. All parameters are out of the way, making it more simple.
Results
The new and improved templates are free for you to view and use at my Github.
Now let’s run Test-ArmDeploymentResource again.
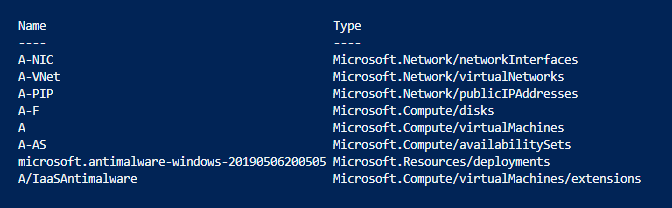
The result is almost the same.
And I can tell you the resources are the same as well.
So was that worth it? Absolutely. Because we now have a readable template with just two parameters that creates a quick and simple deployment, but is also easy to adjust when needed.
So I hope you got some tips and tricks from this post to make your ARM templates production-ready. With a bit of practice you can create very useful templates with very little effort.