In this post, I’m going to show you a way to build, test and deploy bicep with GitHub Actions to Azure. I will make use of Azure CLI tasks, Linter and What-If. By walking step by step through an example, I hope this can give you some guidance to create your own workflow.
Preparation
We need to take some steps before we can go ahead with the pipeline.
Use linter
Bicep Linter provides you with a set of standard rules to determine if your templates are compatible with best practices. It will for example check if all parameters are used. If you use Visual Studio Code with the Bicep extension, you have probably already seen it in action.
A full explanation on Linter can be found here.
Or you can see it in action at the Bicep 0.4 Community call video, where it also shown in a pipeline like it is in this post. (Check out that video, because it gives some great demo’s as well as the latest news on Bicep features!)
Create a Linter configuration file
Linter by default considers a set of rules and classifies them as a warning. For this pipeline, we want the rules to trigger errors, so the pipeline will stop. To do this, we will create a file called bicepconfig.json. In this file, we will define the rules we want to be considered and that we want it to end in an error.
The available rules are documented here. I have used the bicepconfig.json file that is used in the demo by Marcus Felling on this subject, as it does everything I want: Define all rules and set the level to error.
Create a repository with the files
We are going to work with a repository that contains the bicep files and the test/config files. So that comes down to:
- Bicep files and optionally bicep modules. To keep it simple, I will work with just one bicep file that creates a storage account
- A bicepconfig.json file
- ARM-what-if.ps1. I have written a blog post about this script previously. What it will basically do is run What-If against all ARM templates in the repository
Note: ARM-what-if.ps1 needs to have all parameters filled to work. In this case, I have set a default value for the parameters. An alternative would have been to create a separate parameterfile.
If you want to follow along, you can fork or copy the repository I have created here (the finished workflow file is already in there for reference, you can remove it or create a new one).
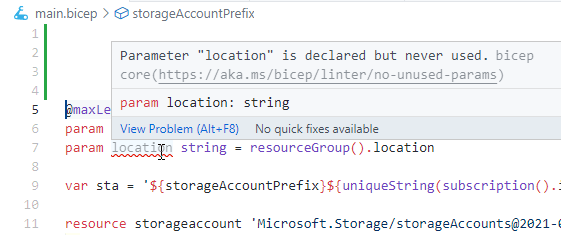
Note: to demo the functionality of the linter, I have left an error in the bicep file on purpose

Create an Azure secret and start the pipeline
To connect with Azure, you need a service principal and store it’s credentials in a secret in GitHub.
I have written about that process and the start of a pipeline before in this post.
Follow the Preparation steps from that post to create a secret called AZURE_CREDENTIALS.
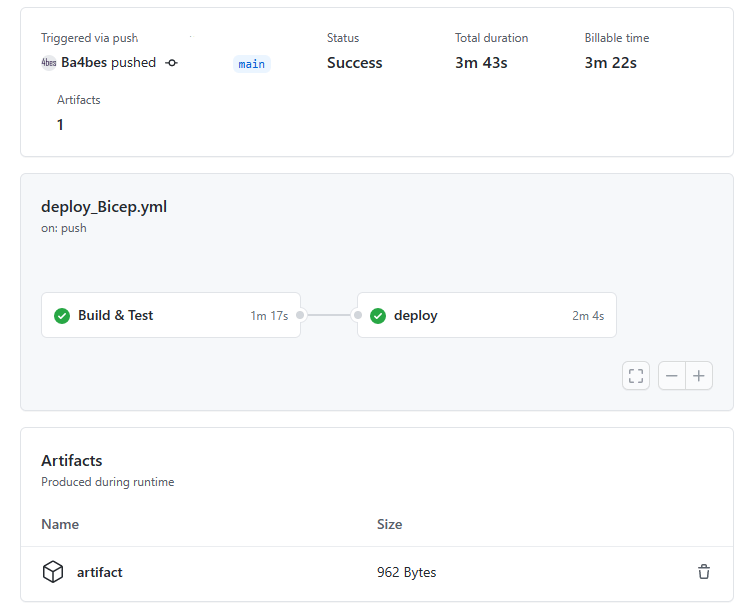
With the preparation done, let’s start the pipeline to build, test and deploy the Bicep templates through GitHub Actions.
Start the build job
Note: I will work through this pretty quickly. For more detailed guidance, see the previous blog post about deploying ARM templates through GitHub Actions.
Start the GitHub Workflow through the Actions menu. Make it trigger on every push and PR to the main branch, as well as manually.
Set environment variables
In the start of the pipeline, we will create some variables to use later on, so the pipeline becomes more flexible. We do it like this:
env:
resourceGroupName: ArmdeploymentTest
bicepfilePath: main.bicep
Where resourcegroupname refers to an existing resource group and bicepFilePath is the file that needs to be tested and deployed. Change the values to your own situation.
To start off, create a build job that runs on ubuntu. You should have this file now.
Note: don’t forget to change the filename to something meaningful
Connect to Azure
We will create a task to connect to Azure. We use the Azure Login task for that. This will create a connection that we can use in this this job.
– name: Azure Login
uses: Azure/login@v1
with:
creds: ${{ secrets.AZURE_CREDENTIALS }}
enable-AzPSSession: true
Build the template
With the connection to Azure ready, let’s build the template. I’ve chosen to do that with the Azure CLI. I save the ARM template in a location I can use later to test with What-If. The task will look like this:
– name: build Bicep file
uses: Azure/cli@1.0.4
with:
inlineScript: |
az bicep build –file ${{ env.bicepfilePath }} –outfile ./main.json
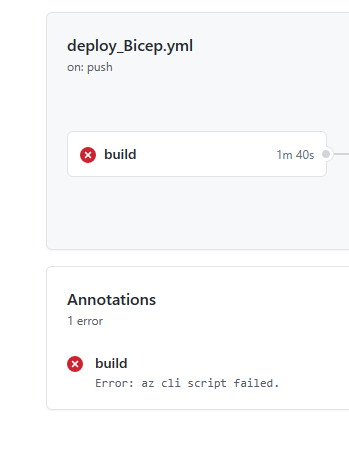
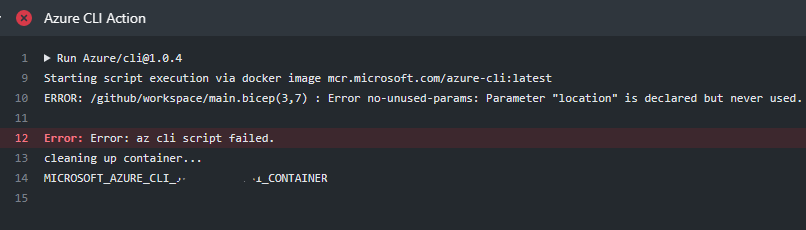
If you want, you can save and run the pipeline now. It will fail at this stage because of the linter rule, as there is an unused parameter. It will state so in the output:
So we have the first test in place!
Upload a build artifact
Now we upload the ARM template tot the pipeline as an artifact. This makes it reachable for the next task, but also creates an artifact that is stored with the pipeline, which can be handy for auditing purposes.
– name: Upload a Build Artifact
uses: actions/upload-artifact@v2.2.4
with:
path: ./main.json
Test the template with what-if
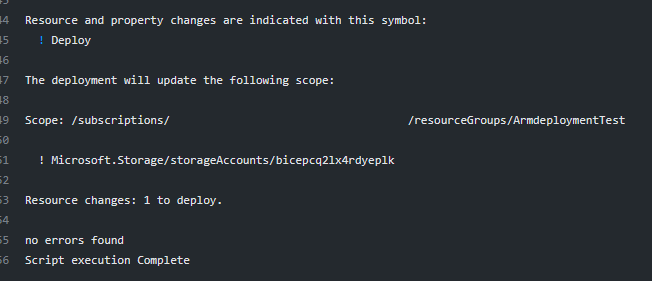
Let’s use the PowerShell script to test the generated template with What-if. This step will error out on any syntax issues (although they are probably already caught by the previous step). But it also give an overview of what resources would be deployed.
Note: You can test bicep files directly, although this script does not support it at this point. This means if this is enough testing, you can skip the bicep build step. This saves pipeline time, but you do miss the linter testing that is now involved.
You can implement it with the following PowerShell action:
– name: Azure PowerShell Action
uses: Azure/powershell@v1
with:
inlineScript: ./ARM_What-If.ps1 -TestResourceGroupName ${{ env.resourceGroupName }}
azPSVersion: latest
The result will be shown in the task output.
Consider manual approval
Now if it fits your use case, this would be an excellent place for a manual approval. Someone can check the last output to see if the results are as expected.
If you want to know more about how you can implement this in GitHub, there is a great guide by Abel Wang here.
Deploy Job
Let’s start a new job to deploy the template to Azure.
We can define that this job will only run if the buildJob was successful.
After that, we connect to Azure again. This would look like this:
deploy:
runs-on: ubuntu-latest
needs: [buildtest]
steps:
– uses: actions/checkout@v2
– name: Azure Login
uses: Azure/login@v1
with:
creds: ${{ secrets.AZURE_CREDENTIALS }}
enable-AzPSSession: true
Deploy the bicep file
Now all we need to do is deploy the bicep file. We again use the Azure CLI.
– name: Deploy bicep to Azure
uses: Azure/cli@1.0.4
with:
# Specify the script here
inlineScript: |
az deployment group create \
–template-file ${{ env.bicepfilePath }} \
–resource-group ${{ env.resourceGroupName }}
And now our workflow is done and you can save it After you do that, it it will deploy the storage account to Azure if no errors are found. The artifact is stored with the workflow. The completed file can be found here.
Alternative GitHub Actions
At the time of writing, there are some actions available that can help you with Bicep. I have decided to use mostly Azure CLI tasks, so it is the most transparent what is actually happening. But a custom action can make a more clean pipeline if you prefer. So I want to mention the available actions:
Bicep Build by aliencube
Setup Bicep by anthony-c-martin
Conclusion
So that Is how you can Build, test and deploy Bicep through GitHub Actions. If you have any questions or suggestions, leave them in the comments!


